Become A Pirate

JOINING THE SCURVEY CREW

Get a Slip on Spanish Bay

Come on in, the water is great!  The Happy Valley Halloween House welcomes and encourages all of our neighbors who are interested in joining the Pirates of Spanish Bay to excel at their display.  To enable the Jackson Hills Neighborhood to become part of the Pirates of Spanish Bay we are sharing our build guides and links to supplies so others can easily replicate our props and create their own.  Learn what we have learned to make your props great out of the gate!

Creating Realistic Weathered Skeltons

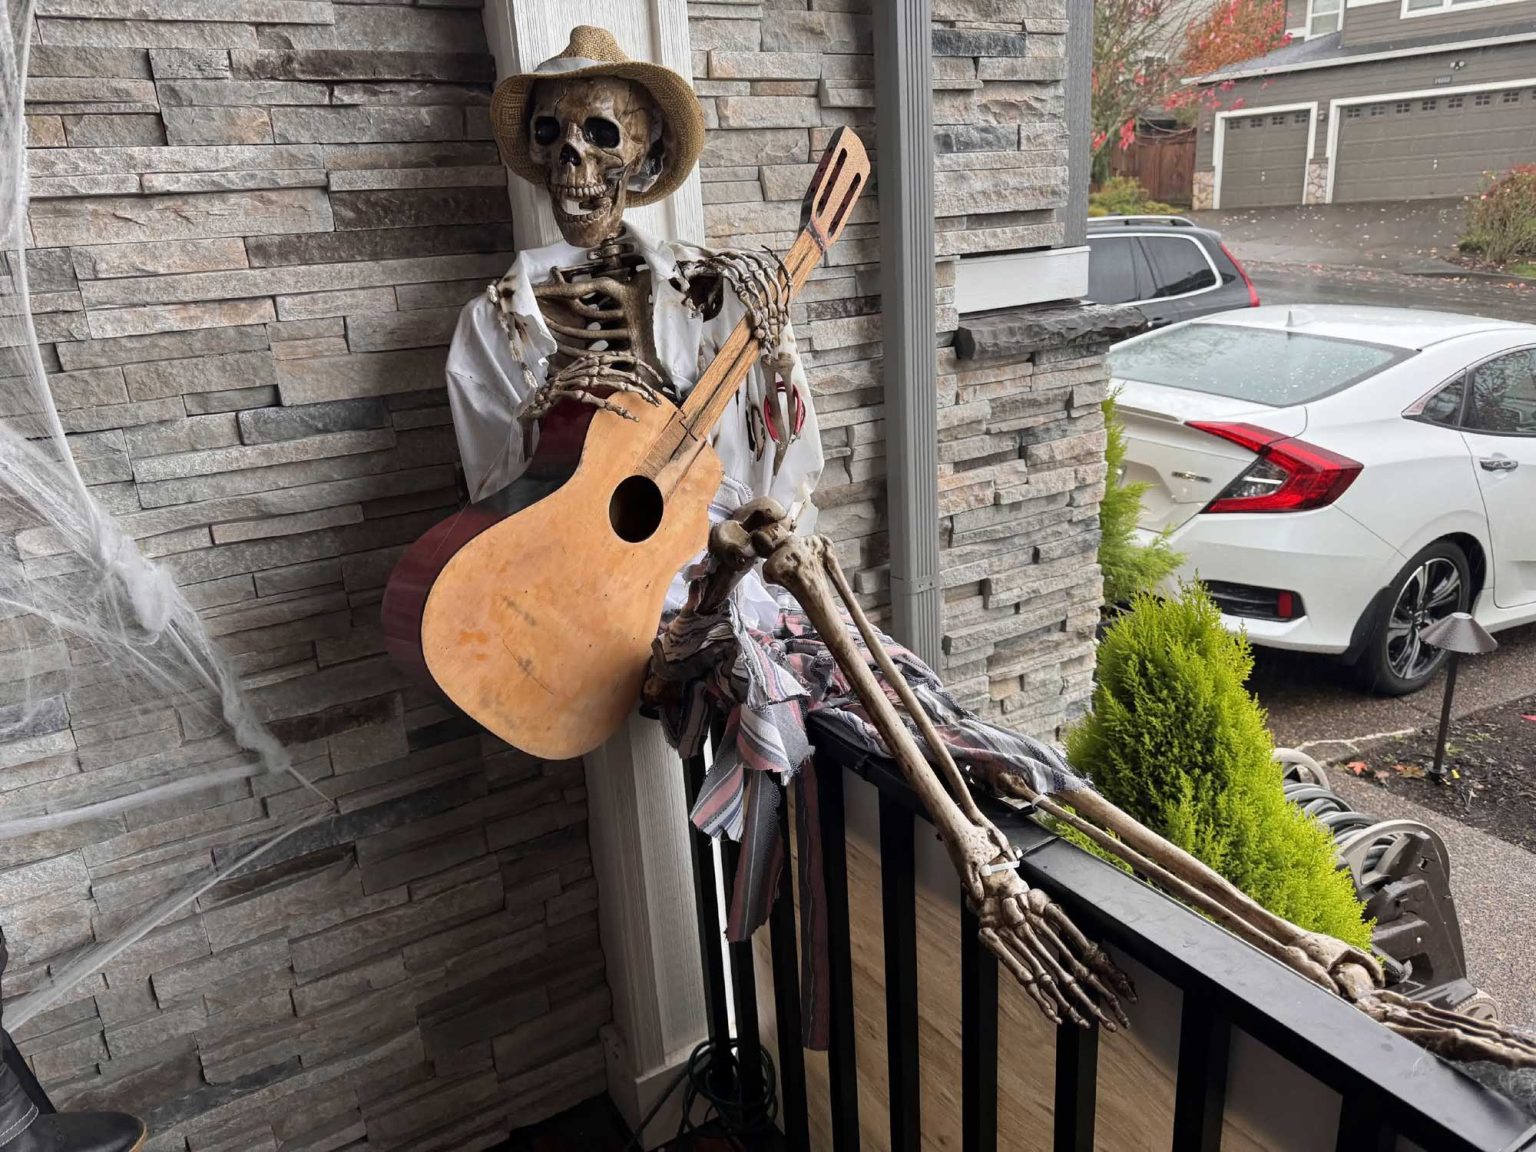
Purchased in early September from Walmart, these 5ft posable skeletons are the best value for your dollar.  It is important to get these early as they are sold out by early October. Spooky skeletons are a hallmark of a good Halloween display, but weathering and dressing your skeletons will bring them to life and give your display a unique flair.

  1. This process involves stain which splatters and is messy.  Start by finding a place to hang your skeleton by the loop in its head to dry as this will be required in later steps.  Drips of stain may drip off the skeleton, so mask accordingly with painters plastic.  Also mask off the area around a comfortable table worksurface.  This is a 5ft skeleton so prepare accordingly and mask off floors and surrounding areas from drips and splatters
  2. Begin with your skeleton lying face down, and using the foam brushes liberally cover the skeleton with stain.  For best results start with the inside of the rib cage, then move to the shoulders, neck, head, outside of the rib cage, pelvis, then legs and arms.
  3. Flip the skeleton and repeat the same process starting with the inside of the rib cage and finishing with the arms.  When you are done there should be no more original white of the skeleton remaining.
  4. I recommend suspending the skeleton upright for inspection using the hanging loop on its head to best inspect the skeleton for any areas missed like this.  Move all joints, check the jaw, bottoms of feet, etc.
  5.  Now lay the skeleton back on the worksurface and use paper towels to wipe off all remaining wet stain starting inside the rib cage and following your same process in step 1.  It is not required to be perfect in this step as wiping off the surface stain allows darker stain to settle into cracks and crevices adding depth and dimension to your project.  You’ll see what I mean when you do the teeth – it really adds visual interest.
  6. Hang your skeleton to dry using the loop on its head.  Ideally place a fan on the skeleton, but it will need a full 24 hours to dry.


Dressing Skeltons for Success

Dressing and posing skeletons is generally up to artistic license.  There are some tips however.  We have found that generally youth large and adult small clothes work best.  Synthetic fabrics weather the best.  Contrasting colors such as a white shirt and navy vest with gold buttons would be a great mix for visibility at a distance.  Finish off the look with some hacked off light brown dress pants, a wig, and a square of scrap red fabric for a bandana.  Dark colors are hard to see, medium and light contrasting colors are best.  Many clothing items can be found inexpensively on Temu or at your local second hand store such as the Red White and Blue store (best value), Salvation Army (good value) or Goodwill. These stores offer weekly rotating sales based on the color of the tags.  For example, red tags will be 40% on one week and yellow tags 40% the next.  Find out what day these sales begin and shop at that time.

  1. Add pants and a shirt to your skeleton, hold any accessories until later.  Decide how you would like to pose the skeleton. See our ideas.
  2. Using a hot glue gun, zip ties  and/or gorilla glue, glue the skeleton’s joints to pose them properly.  It may be necessary to remove joint screws in order to pose your skeleton and use a zip tie as a joint instead.
  3. Use the hot glue gun to glue clothing to shoulders, elbows and wrists.  Its important that the clothing stays in place for the Halloween season.
  4. If required to hold an item, bones in the wrist and hands may need to be shaped.  I recommend an oven glove, heat gun and patience in this process.  To shape the hand, place your hand behind the skeleton hand, palms up.  Slowly use the heat gun to heat each finger, focusing on the finger joints, until you can feel the fingers are now bendable.  Slowly bend the fingers about an inch and let cool for 30 seconds before repeating.  Once grip is appropriately closed, use a zip tie to secure the item to the palm or wrist by drilling two small holes in the palm and using a zip tie.
  5. Fully dress the skeleton, using the hot glue and or zip ties to secure the clothing.  For vests, belts and headwear, assure these are glued and secured properly for the Halloween season.
  6. With the spray bottle of water close by, now weather the clothing using the heat on its high setting to burn holes in the clothes  Burn all edges of the clothes to simulate dirtiness and deterioration.
  7. All pirates need boots.  Flat sole black boots with straps and buckles look best. To install boots, tape the skeleton feet so they are toes up.  Drill two holes in the sole of the boots and zip tie the boot to the foot, just above the ankle.
  8. Feel free to add rings, jewels, and whatever you think a scurvy half dead skeleton needs.  We have found disposable clear cups from the dollar store that are painted with gold spray paint look great.
 

Realistic Weathered Tombstones

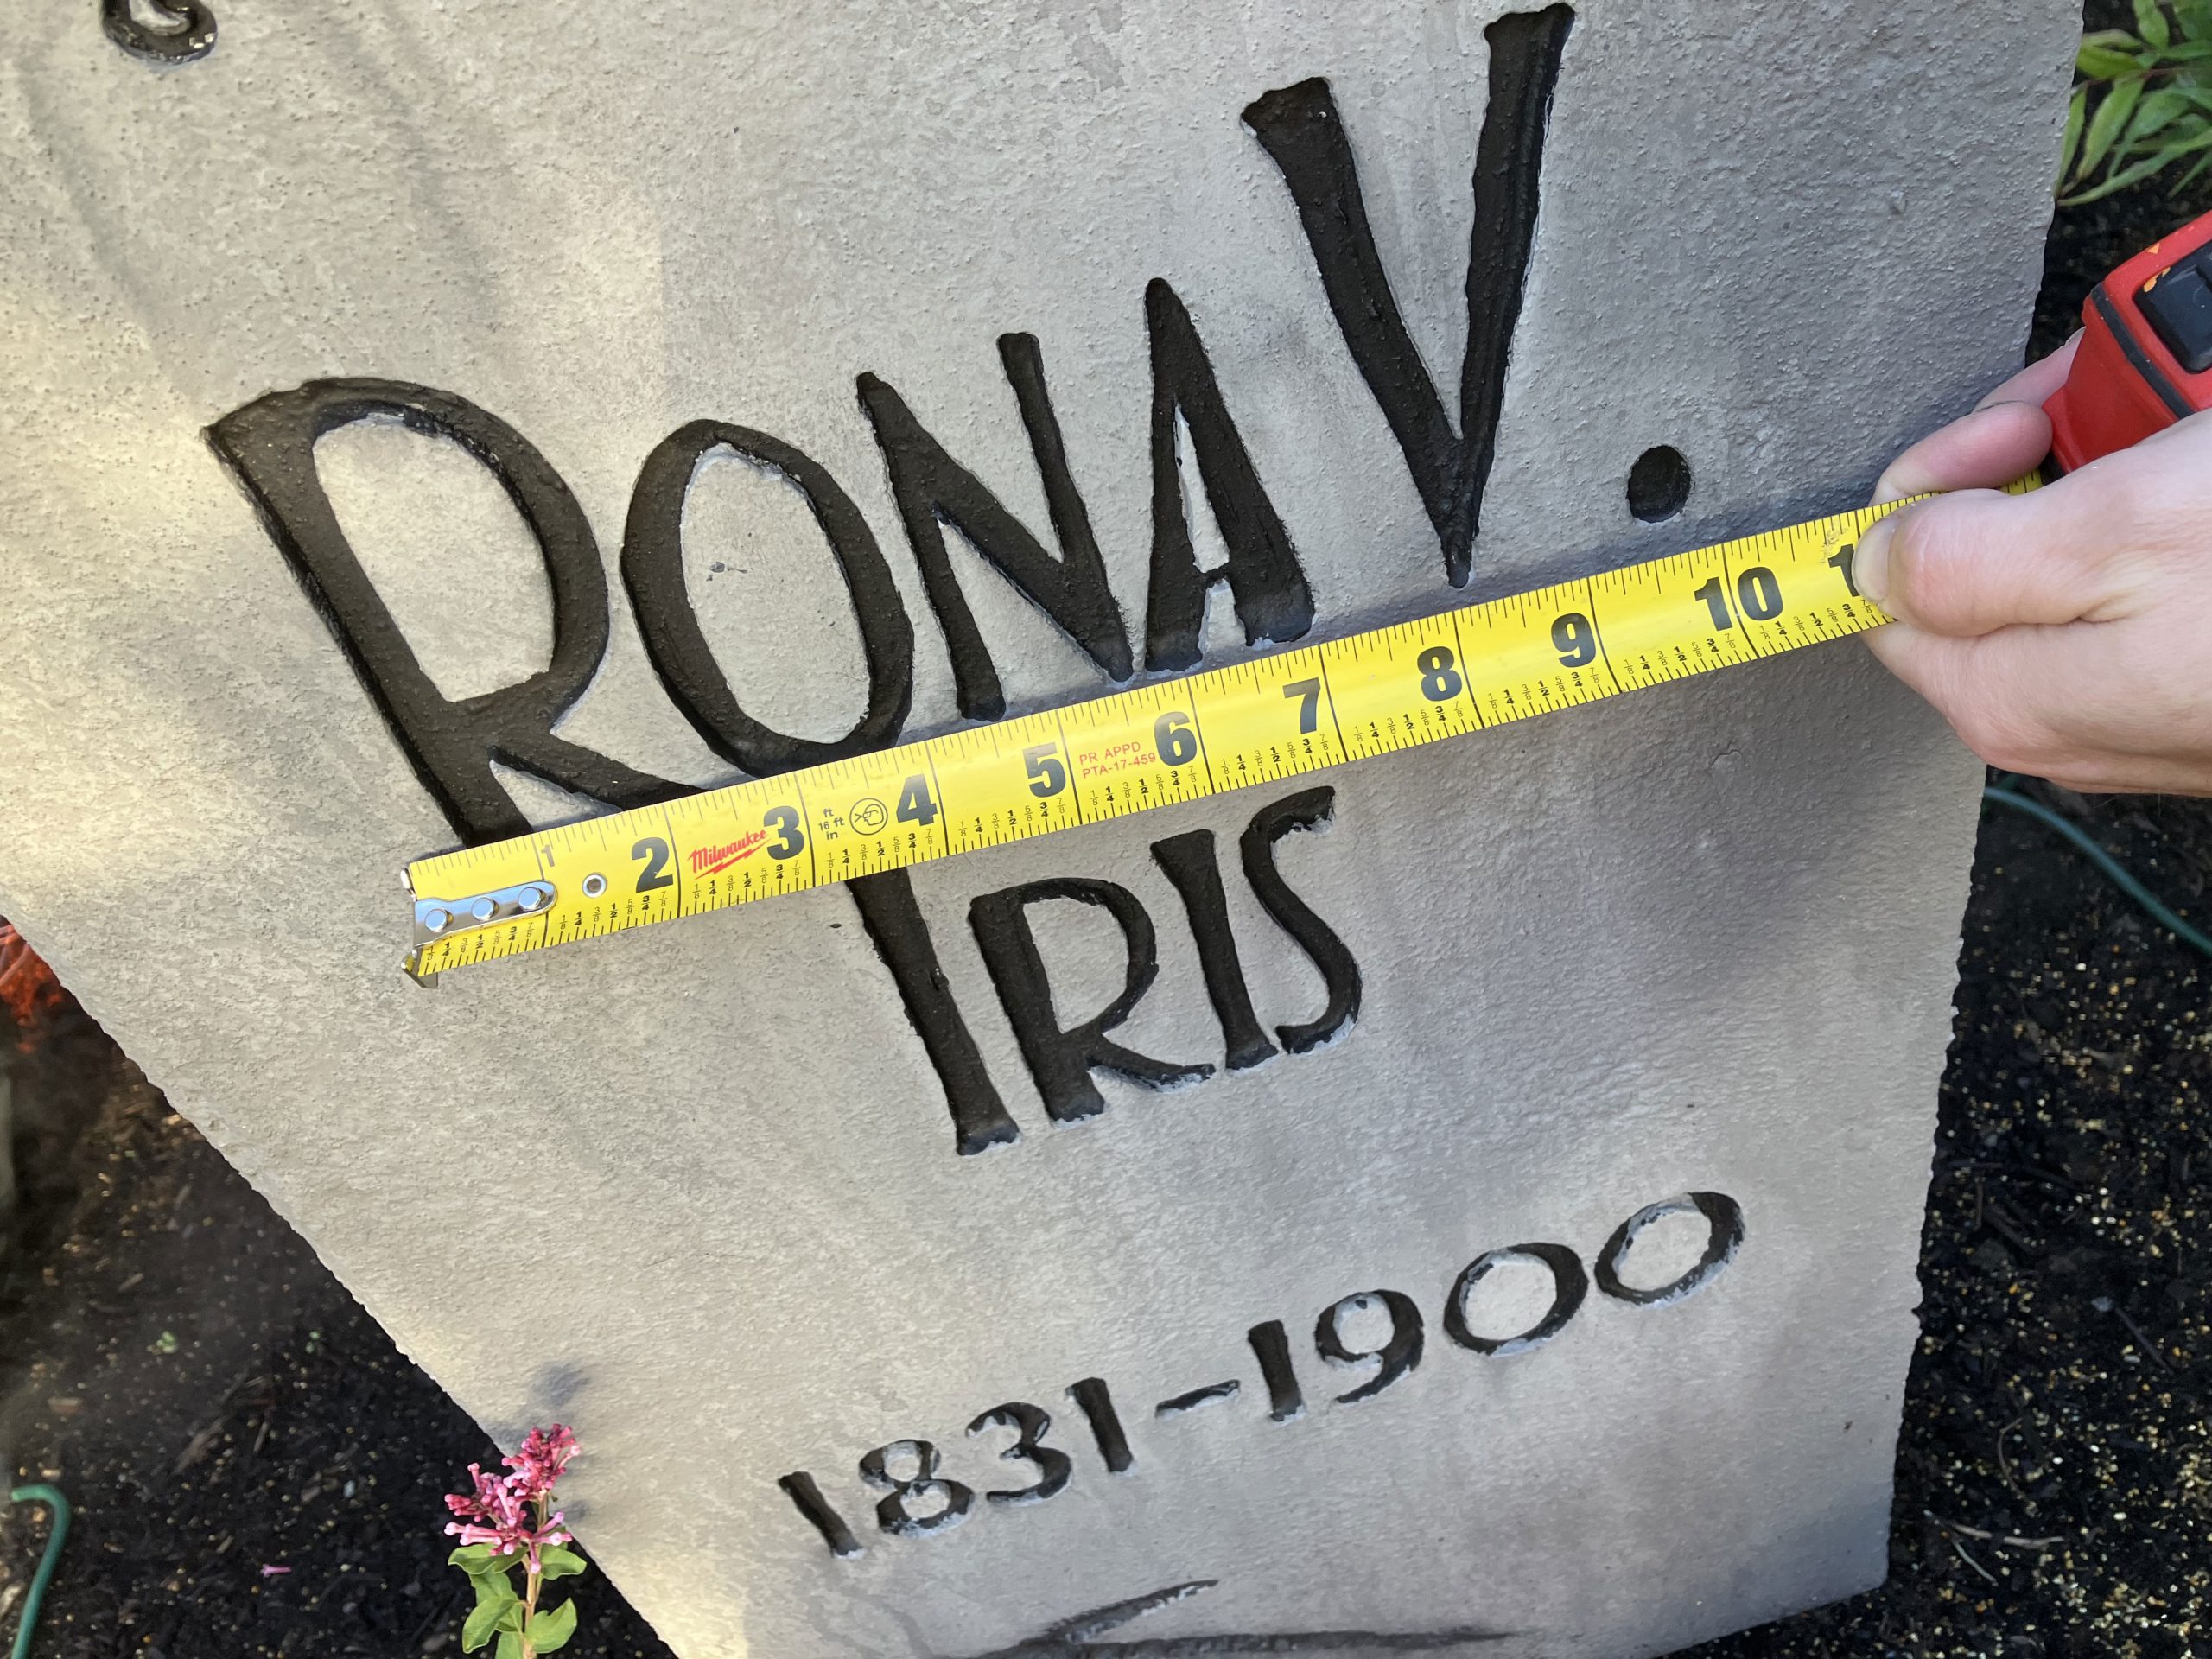
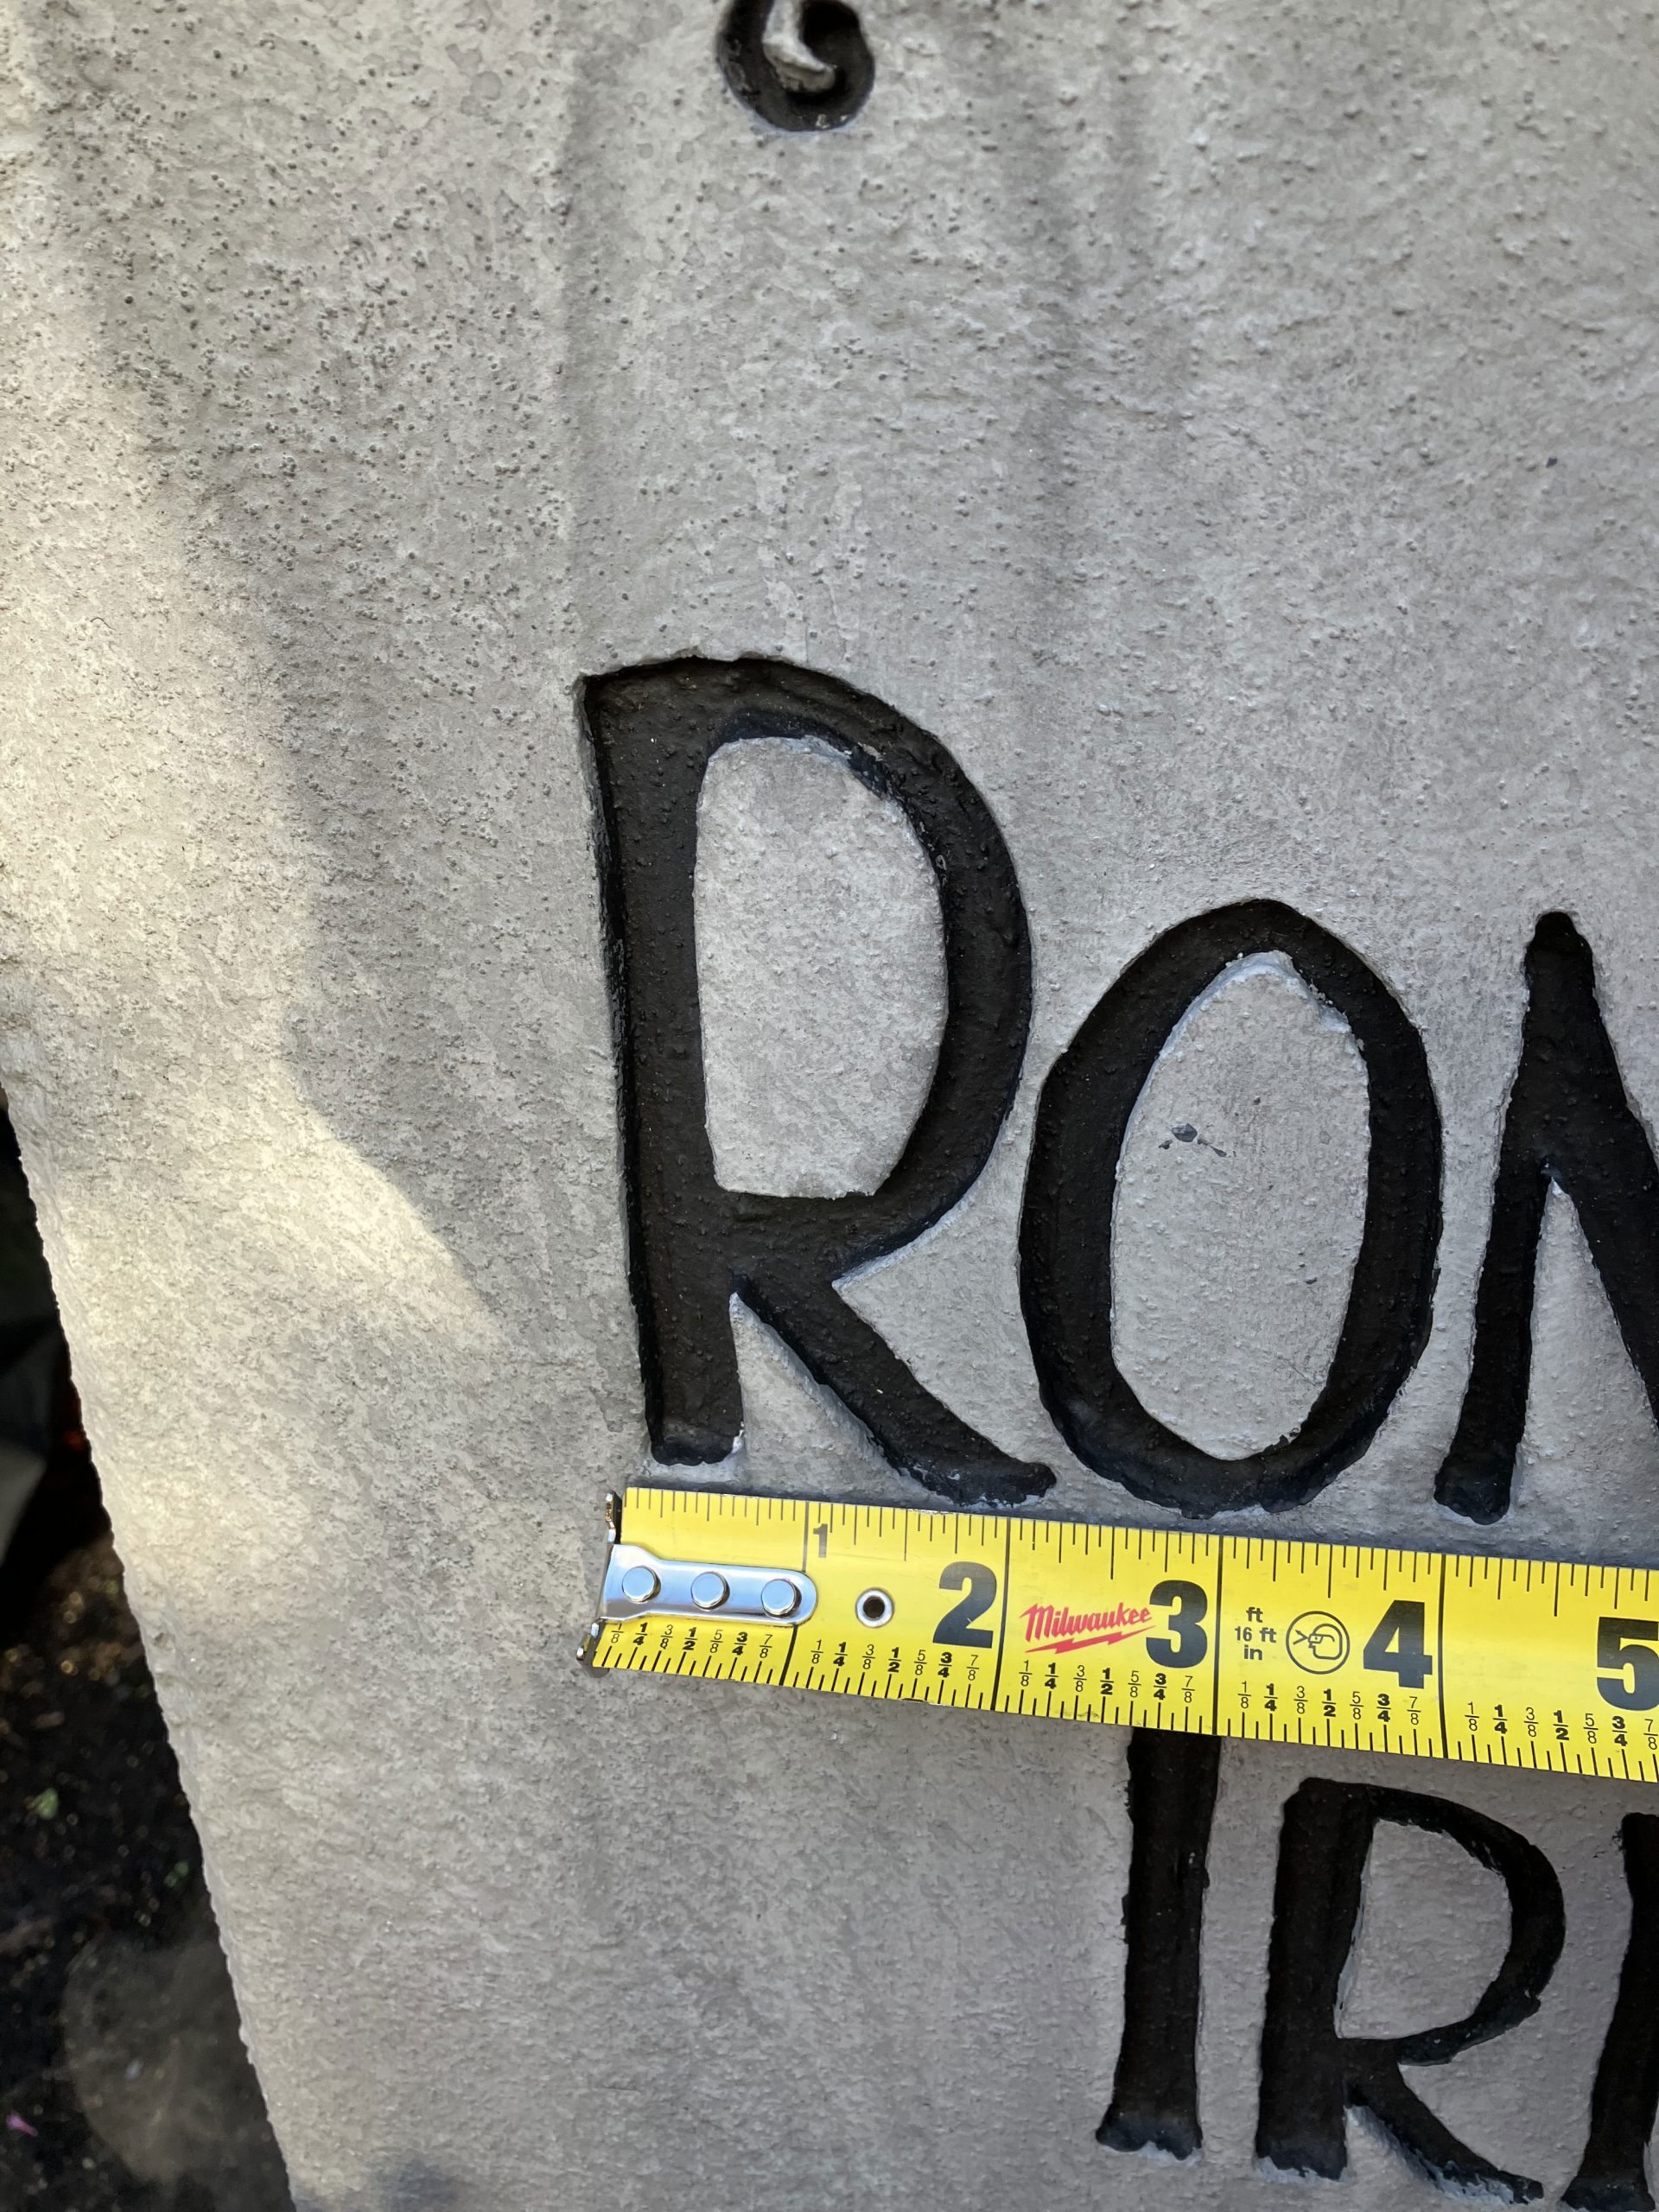
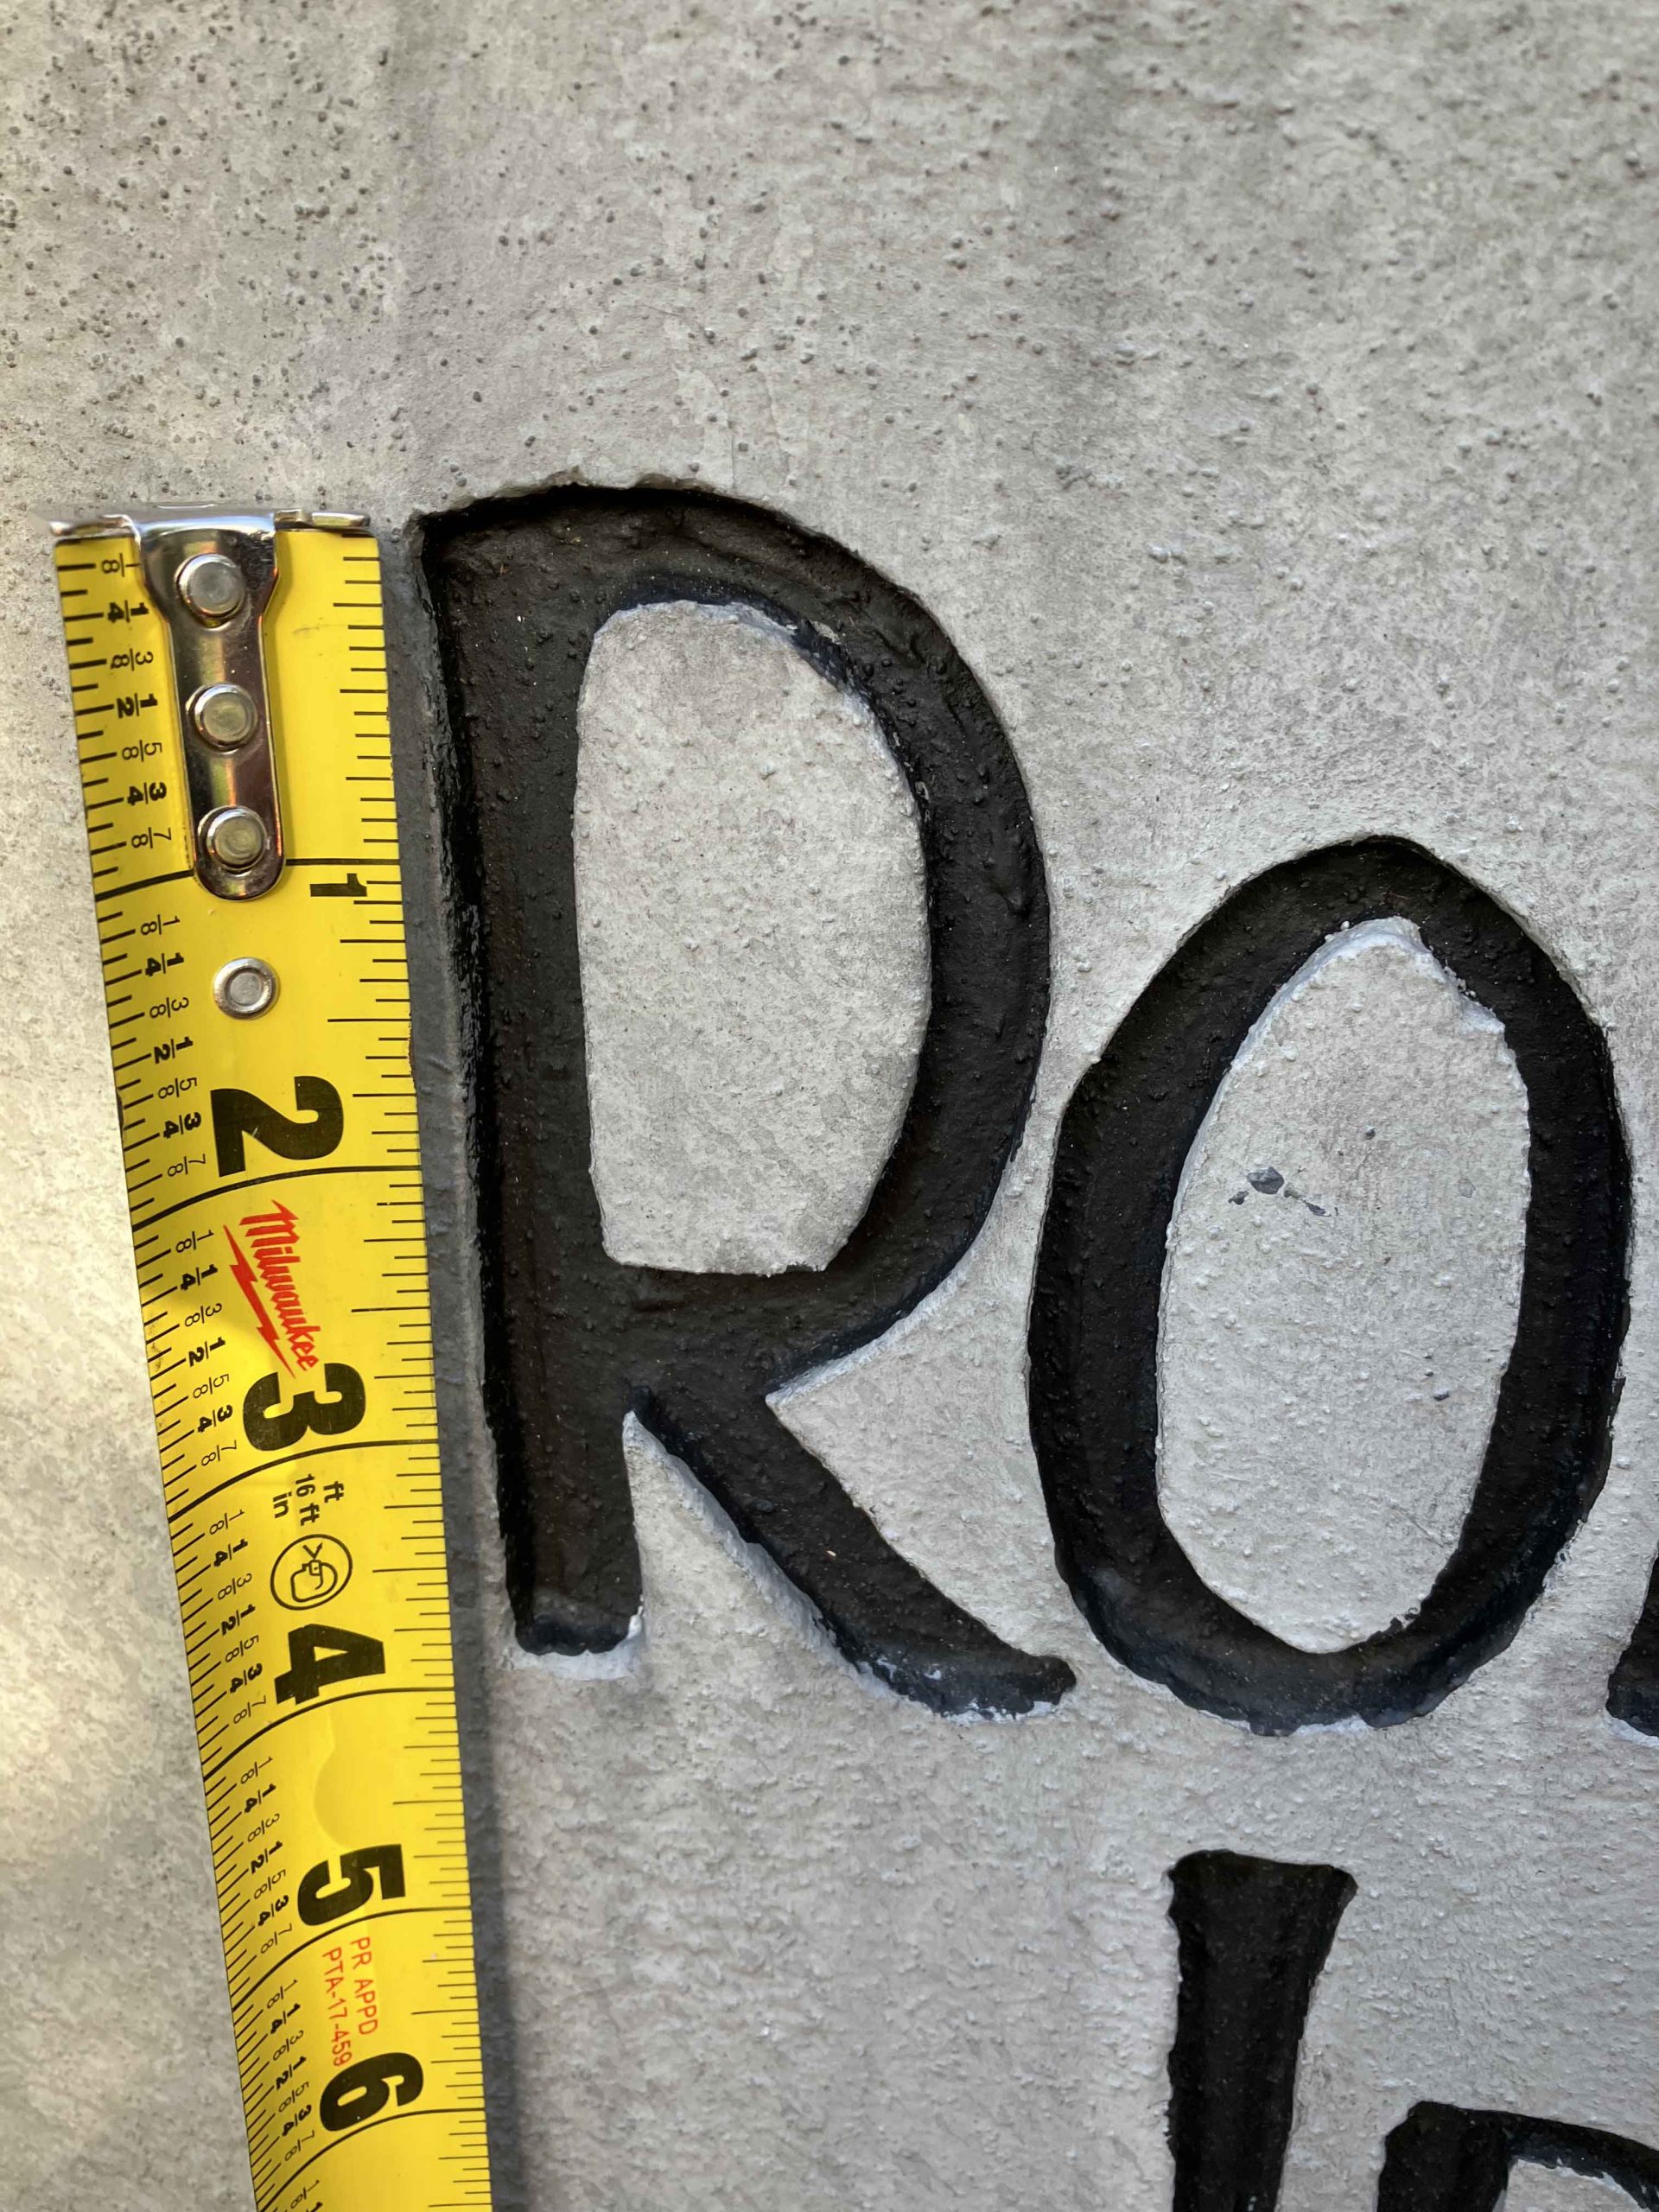
A single 4×8 sheet of pink closed foam board will yield 4-6 tombstones depending on size.  Use pencil first to mark up your tombstone and then a sharpie to finalize the areas you will cut out with a dremel or similar rotary tool.  Mark up your tombstone and make adjustments to the design as all of your markings will be covered by the DryLoc paint in later steps and disappear. A rotary tool is used to cut depth into all text and then cut out areas are painted black to add dimension to lettering.  Add designs and cracks to your tombstones for an extra spooky, unique and realistic effect.   

  1. Begin by measuring squares for each of your tombstones and marking the pink foamboard.  Using the hot knife (optional) or snap off knife, cut the foam into squares.  If your board is pre-scored, do not be concerned as the score marks will be painted over later and disappear. A hot knife is recommended for ease of cutting the foamboard, but a snap off knife will accomplish the task.
  2.  Find a shape for your first tombstone and outline cut marks by using a pencil.  A simple tombstone is recommended to start, but for more ideas on shapes see our gallery page.
  3. Find a clever phrase for your tombstone epithet and draw some level and straight lines using pencil where you’ll want your text to go.  A straight edge or tape and a tape measure will help in making your letters equal height and maintain level.
  4. Using your computer type out your epithet.  I used all capital letters with the starting letter of a word four inches tall and two inches wide, and all other letters three inches tall.  Fonts such as Bell MT and Castellar work well for this project.  Print your letters and cut them out using using the Snap Off knife or scissors to make a stencil.  For letters like O and A that have internal pieces, a small bit of masking or painters tape can be used to hold these in place temporarily.  Tape the edges of your stencil down by using painters or masking tape, then using the pencil, draw the borders of the letters you will cut out by using your stencil.  Very small piece of tape are helpful for taping down complicated or large letters.  It is easy to fill in what you missed when you remove the stencil.
  5. Small designs such as bats, skulls, and other artistic elements can be added for visual interest.  The method is the same, print these and make stencils.  Additional elements are best mirrored on both sides of the tombstones to produce the ideal result.
  6. Using a sharpie, go back over your pencil markings, text, and other elements to finalize what you will be cutting out.  Assure all areas you will be cutting such as letters and designs are filled in with black sharpie to avoid any confusion while cutting – as mistakes are difficult if not impossible to repair.  NOTE: Any color spray paint can be used instead of a sharpie to transfer your stencil the tombstones, however this must be done carefully as certain spray paints will dissolve the foam.  Test any paint on a scrap piece first and let rest 10 minutes. 
  7. With your cutting area defined, load the cutting bit into the rotary tool and use the height adjustment kit to assure the bit depth is 1/2 inch.  This means the bit extends 1/2 beyond the guide and into the foam
  8. Using the rotary tool, slowly cut out all text and designs.  Its best to plunge the bit into the center of an area you will cut out, then move out to the edges.  At this step it is crucial to have plenty of light on your work area.  I additionally recommend a headlamp to assure accuracy of your cuts.  A shop vac is also recommended to have taped to back side of your rotary tool height adjustment guide to clear foam debris as you cut and allow better visibility.  Look into the window of the guide as you cut and move slowly.  Patience is key.
  9. It all went perfect, right?  If mistakes were made – for example on the letter A the center of the A was removed –  the best solution is to first cut a new 1/2 thick rectangular piece of foam that will cover the entire letter A.  Trace the outline of this scrap block onto the damaged area tombstone.  Next, use your rotary tool to cut out the rectangular area you traced.  Then use Gorilla Glue to glue in the repair rectangle.  Wait 8 hours and repeat step 8.  The rotary tool set to a depth of zero can remove any unwanted glue foam that is on the surface of the tombstone. Good luck and Godspeed.
  10. With your text and designs implemented, use the cut off knife to cut 1/4 deep valleys into the tombstone to represent cracks.  Generally for best results start larger deeper valleys (cracks) at the edges of the tombstones and slowly make the cracks smaller as they split or branch inward in toward the inside of the tombstone.  For best results have your cracks avoid any text.
  11. Now use the rasp on the edges of your tombstone to create a weathered look.  A heat gun can also be used at this step to enhance the weather effect however take care to not melt any text or intricate elements as they will melt easily.
  12. Using the DryLoc paint and the chip brush, generously cover the entire tombstone, including the text.  Two coats will be required front and back.  Allow to fully dry according to instructions.
  13. Cut the grey PVC conduit into 6 inch lengths.  Using Gorilla Glue, attach the grey PVC pipe to the back of your tombstone vertically, about 10 inches apart.  These will be used later for staking down your tombstone with rebar, a stick, or similar to keep the tombstone upright.  When gluing, arrange the tombstone face down and align the end of the PVC with the bottom of your tombstone and have the pipe run vertically up the back of the tombstone.  Apply Gorilla Glue liberally and spray with water for best adhesion. Let dry for 12 hours.
  14. Using artistic brushes and the black paint, paint all of your text and design elements.  The photo to the left is a great tombstone sample.  Also paint the inside of text and artistic elements as it adds depth to the effect.  Let dry.
  15. To add additional weathered effect, place the tombstone in the upright position tipped slightly forward and apply small strokes of black paint to the top, cracks, and lettering.  Using the water spray bottle, liberally spray the areas of fresh paint. The black paint will naturally run down the surface to create a more weathered effect.
  16. A simple clamp light, timer, LED bulb, orange cellophane folded over on itself twice are used to illuminate each gravestone at night.  Use a rubber band around the base of the light to hold the cellophane in place.

Live Firing Smoke Ring Cannons

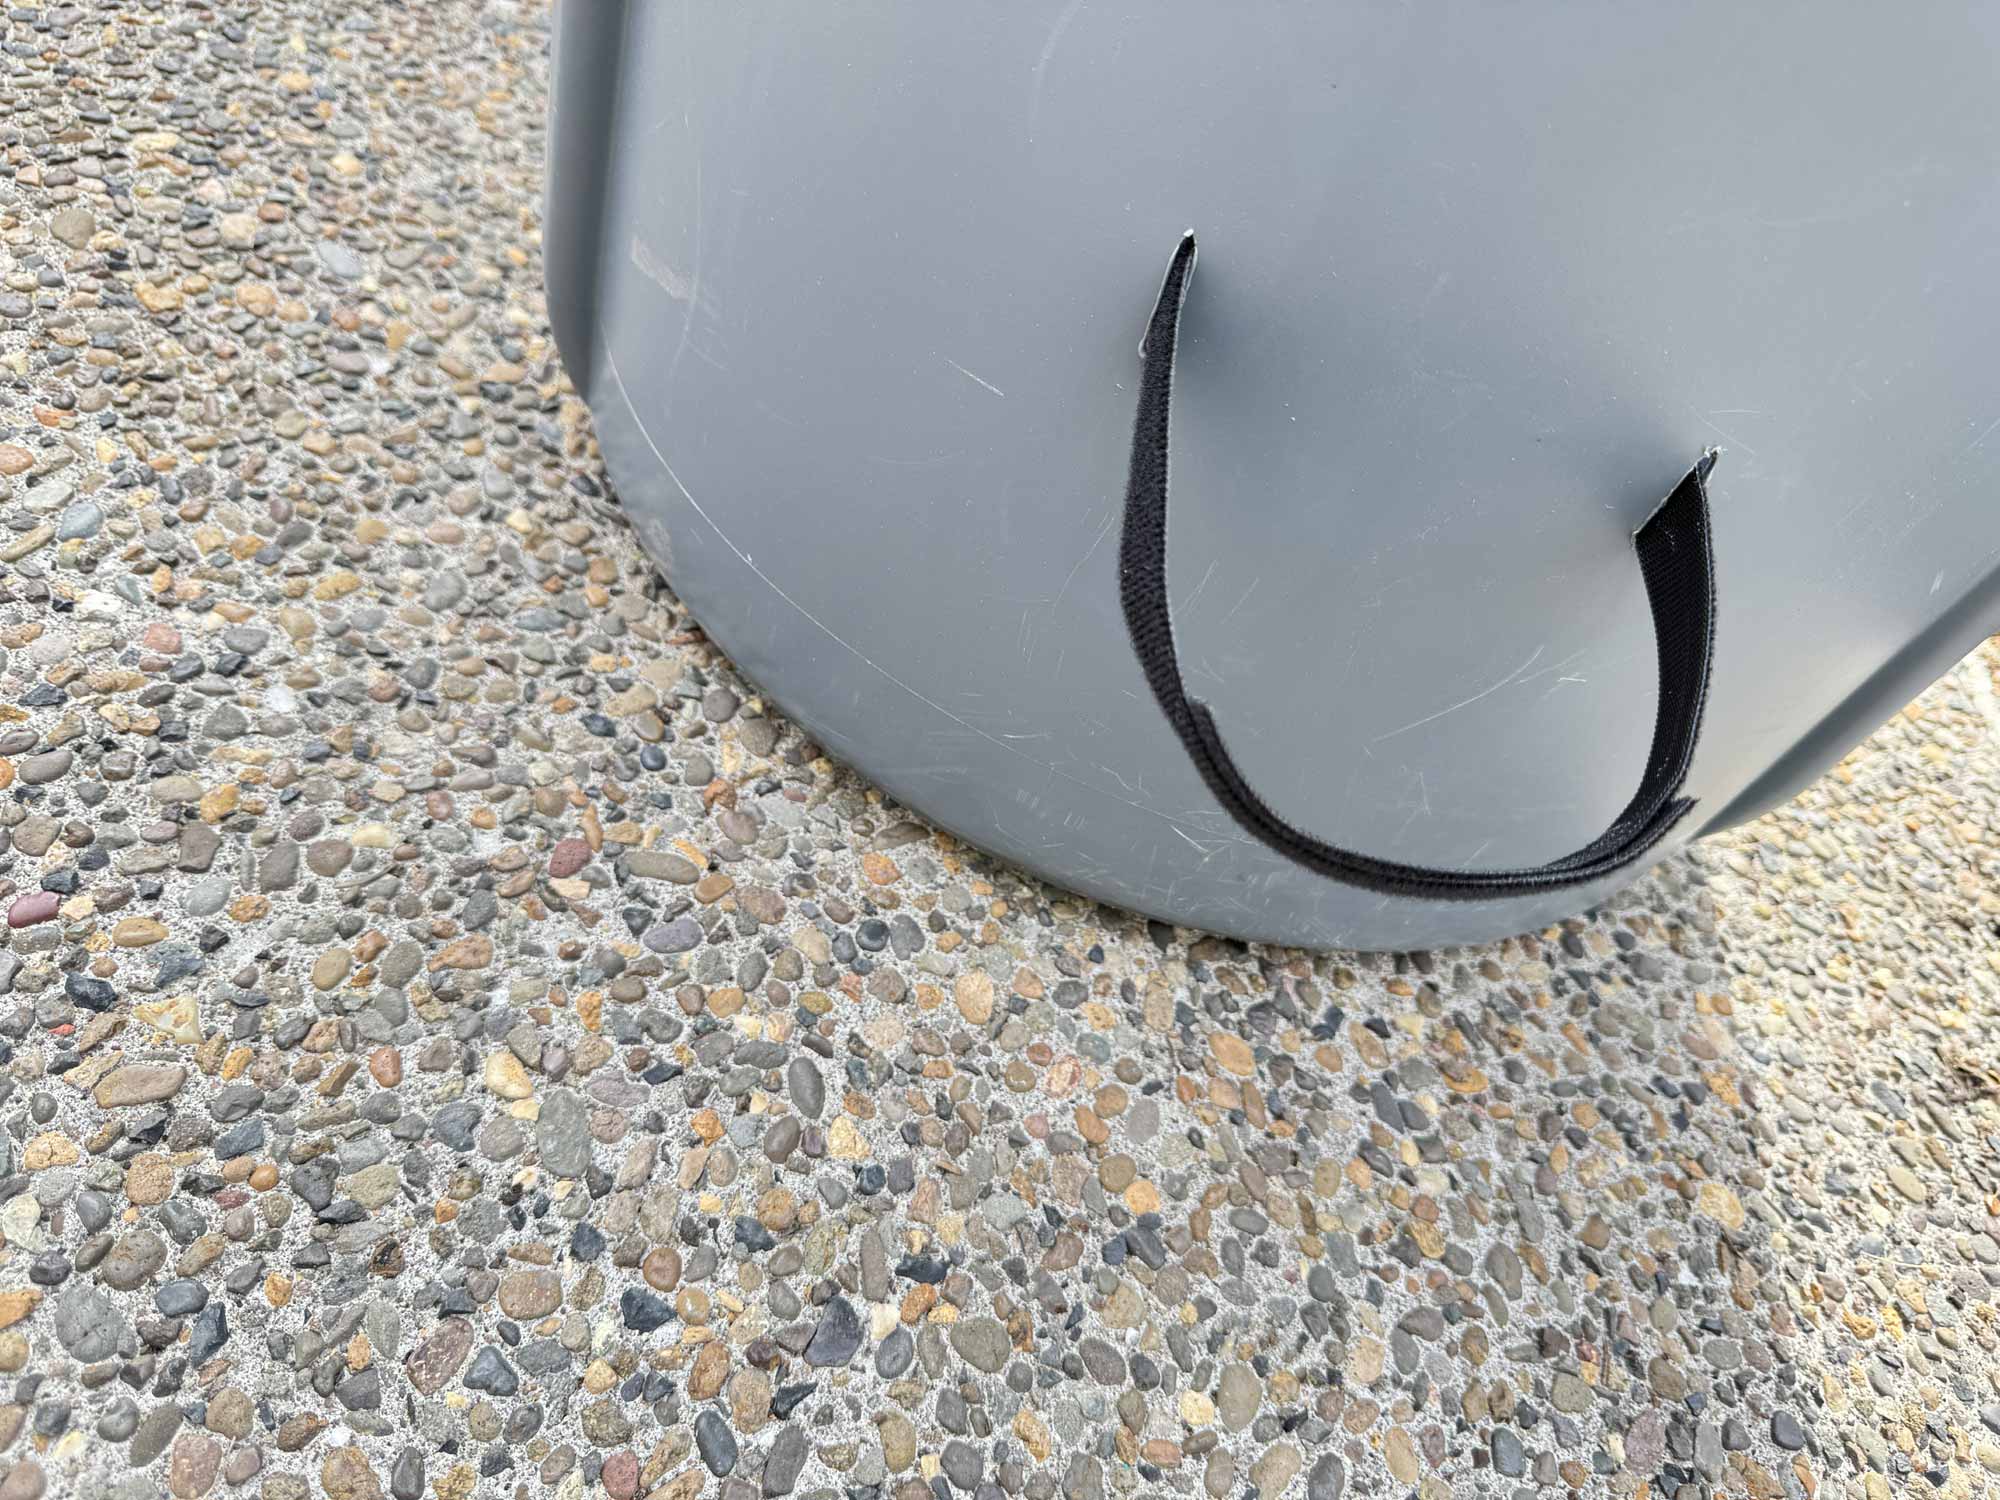
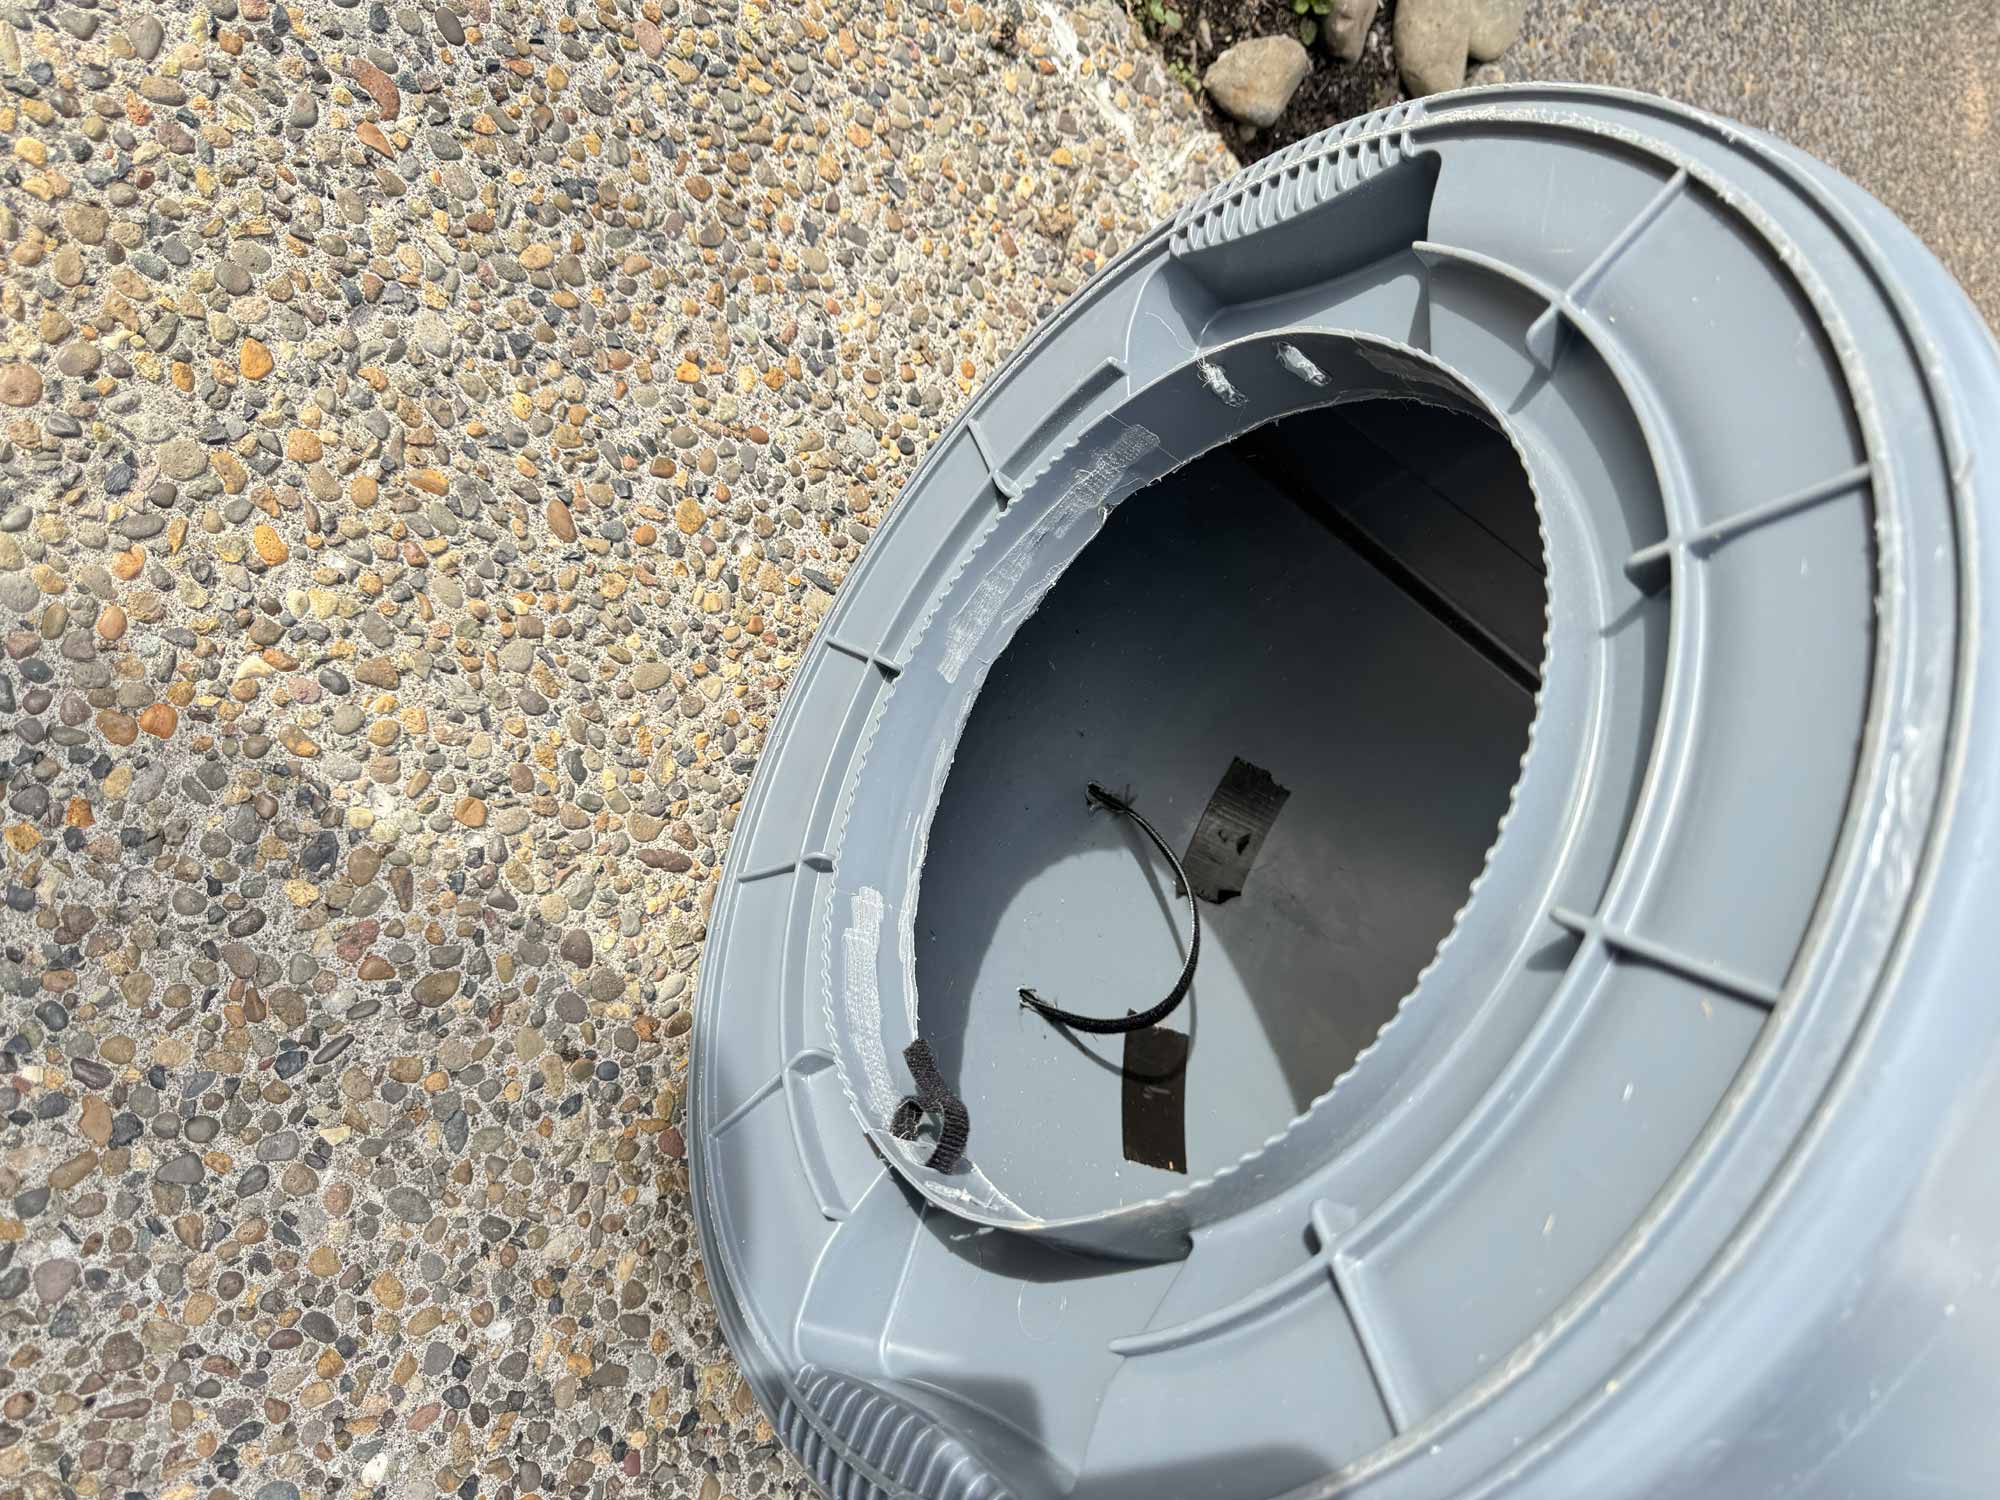
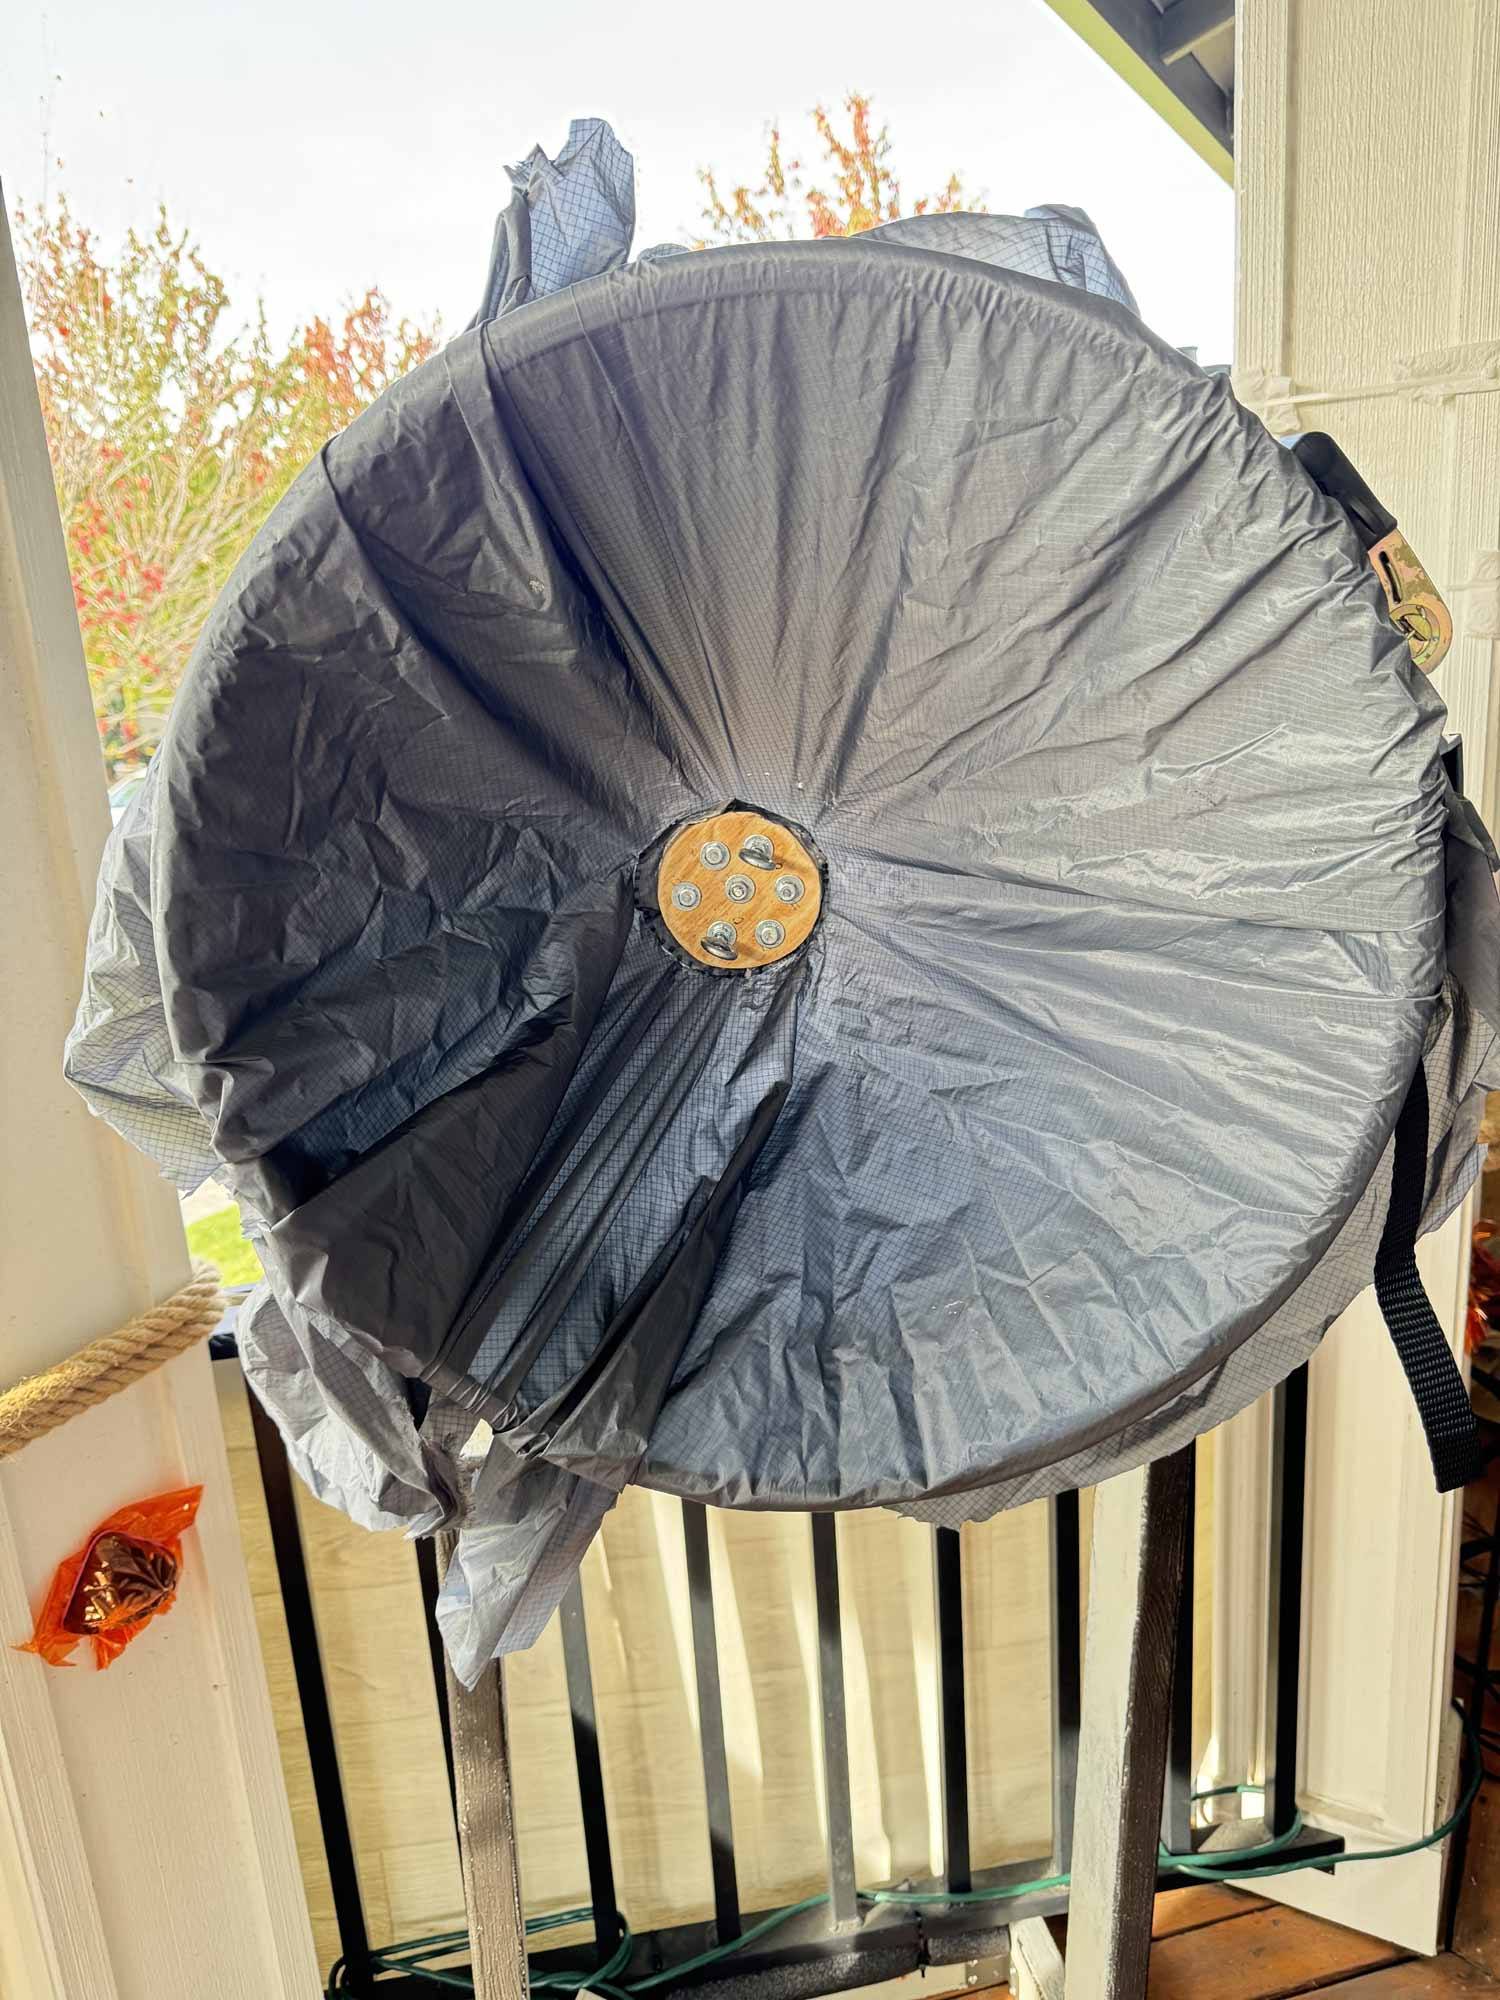
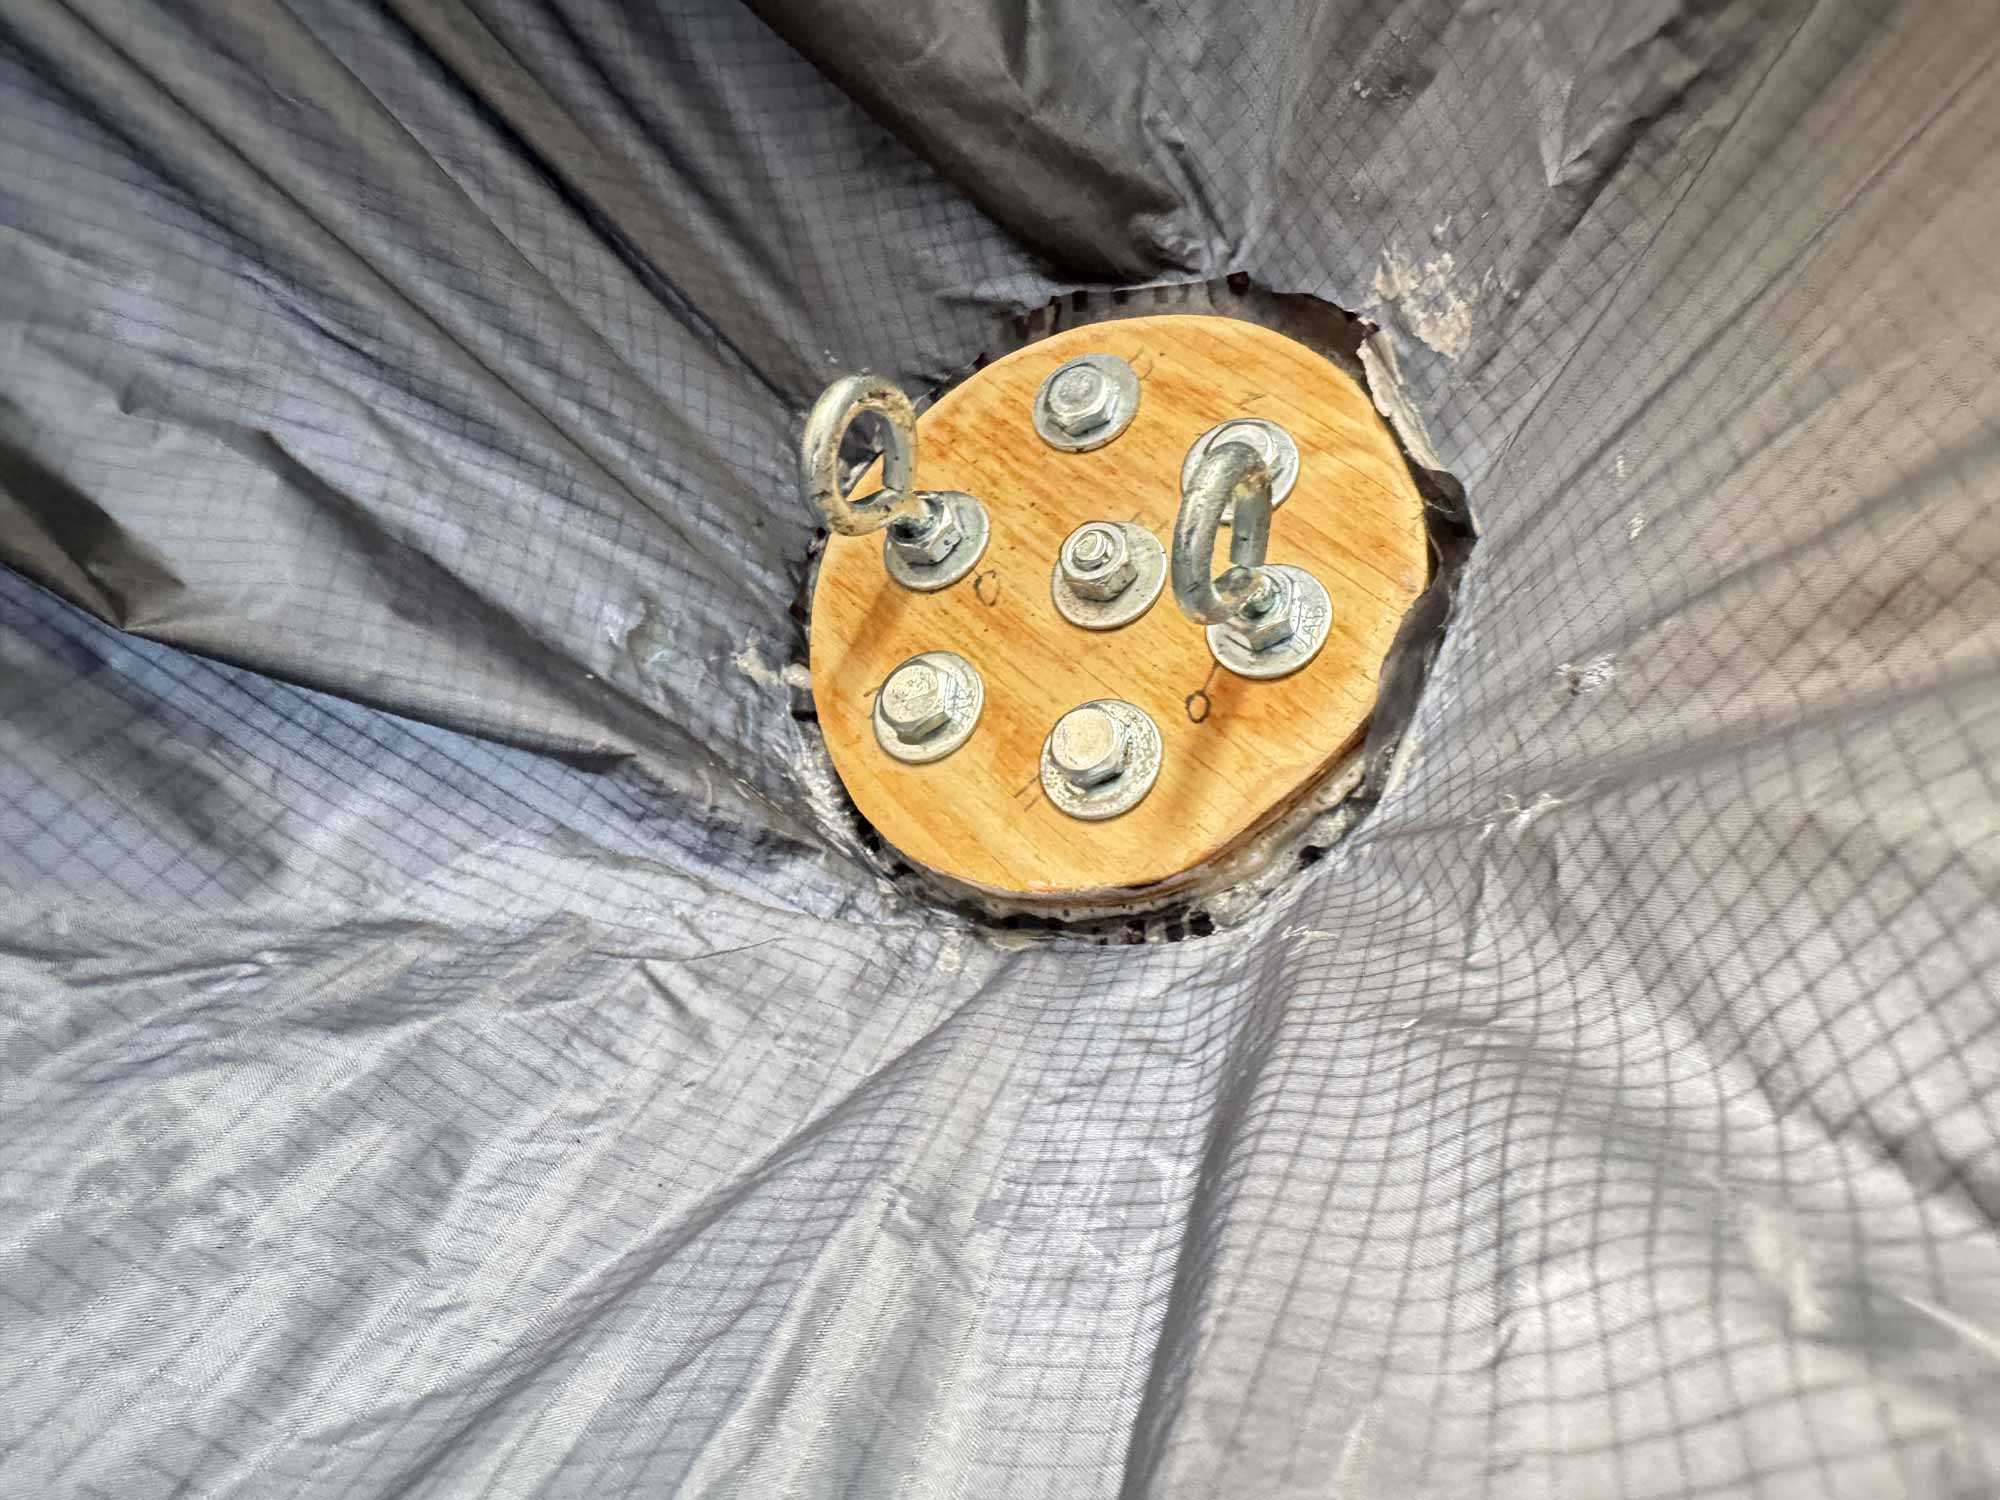
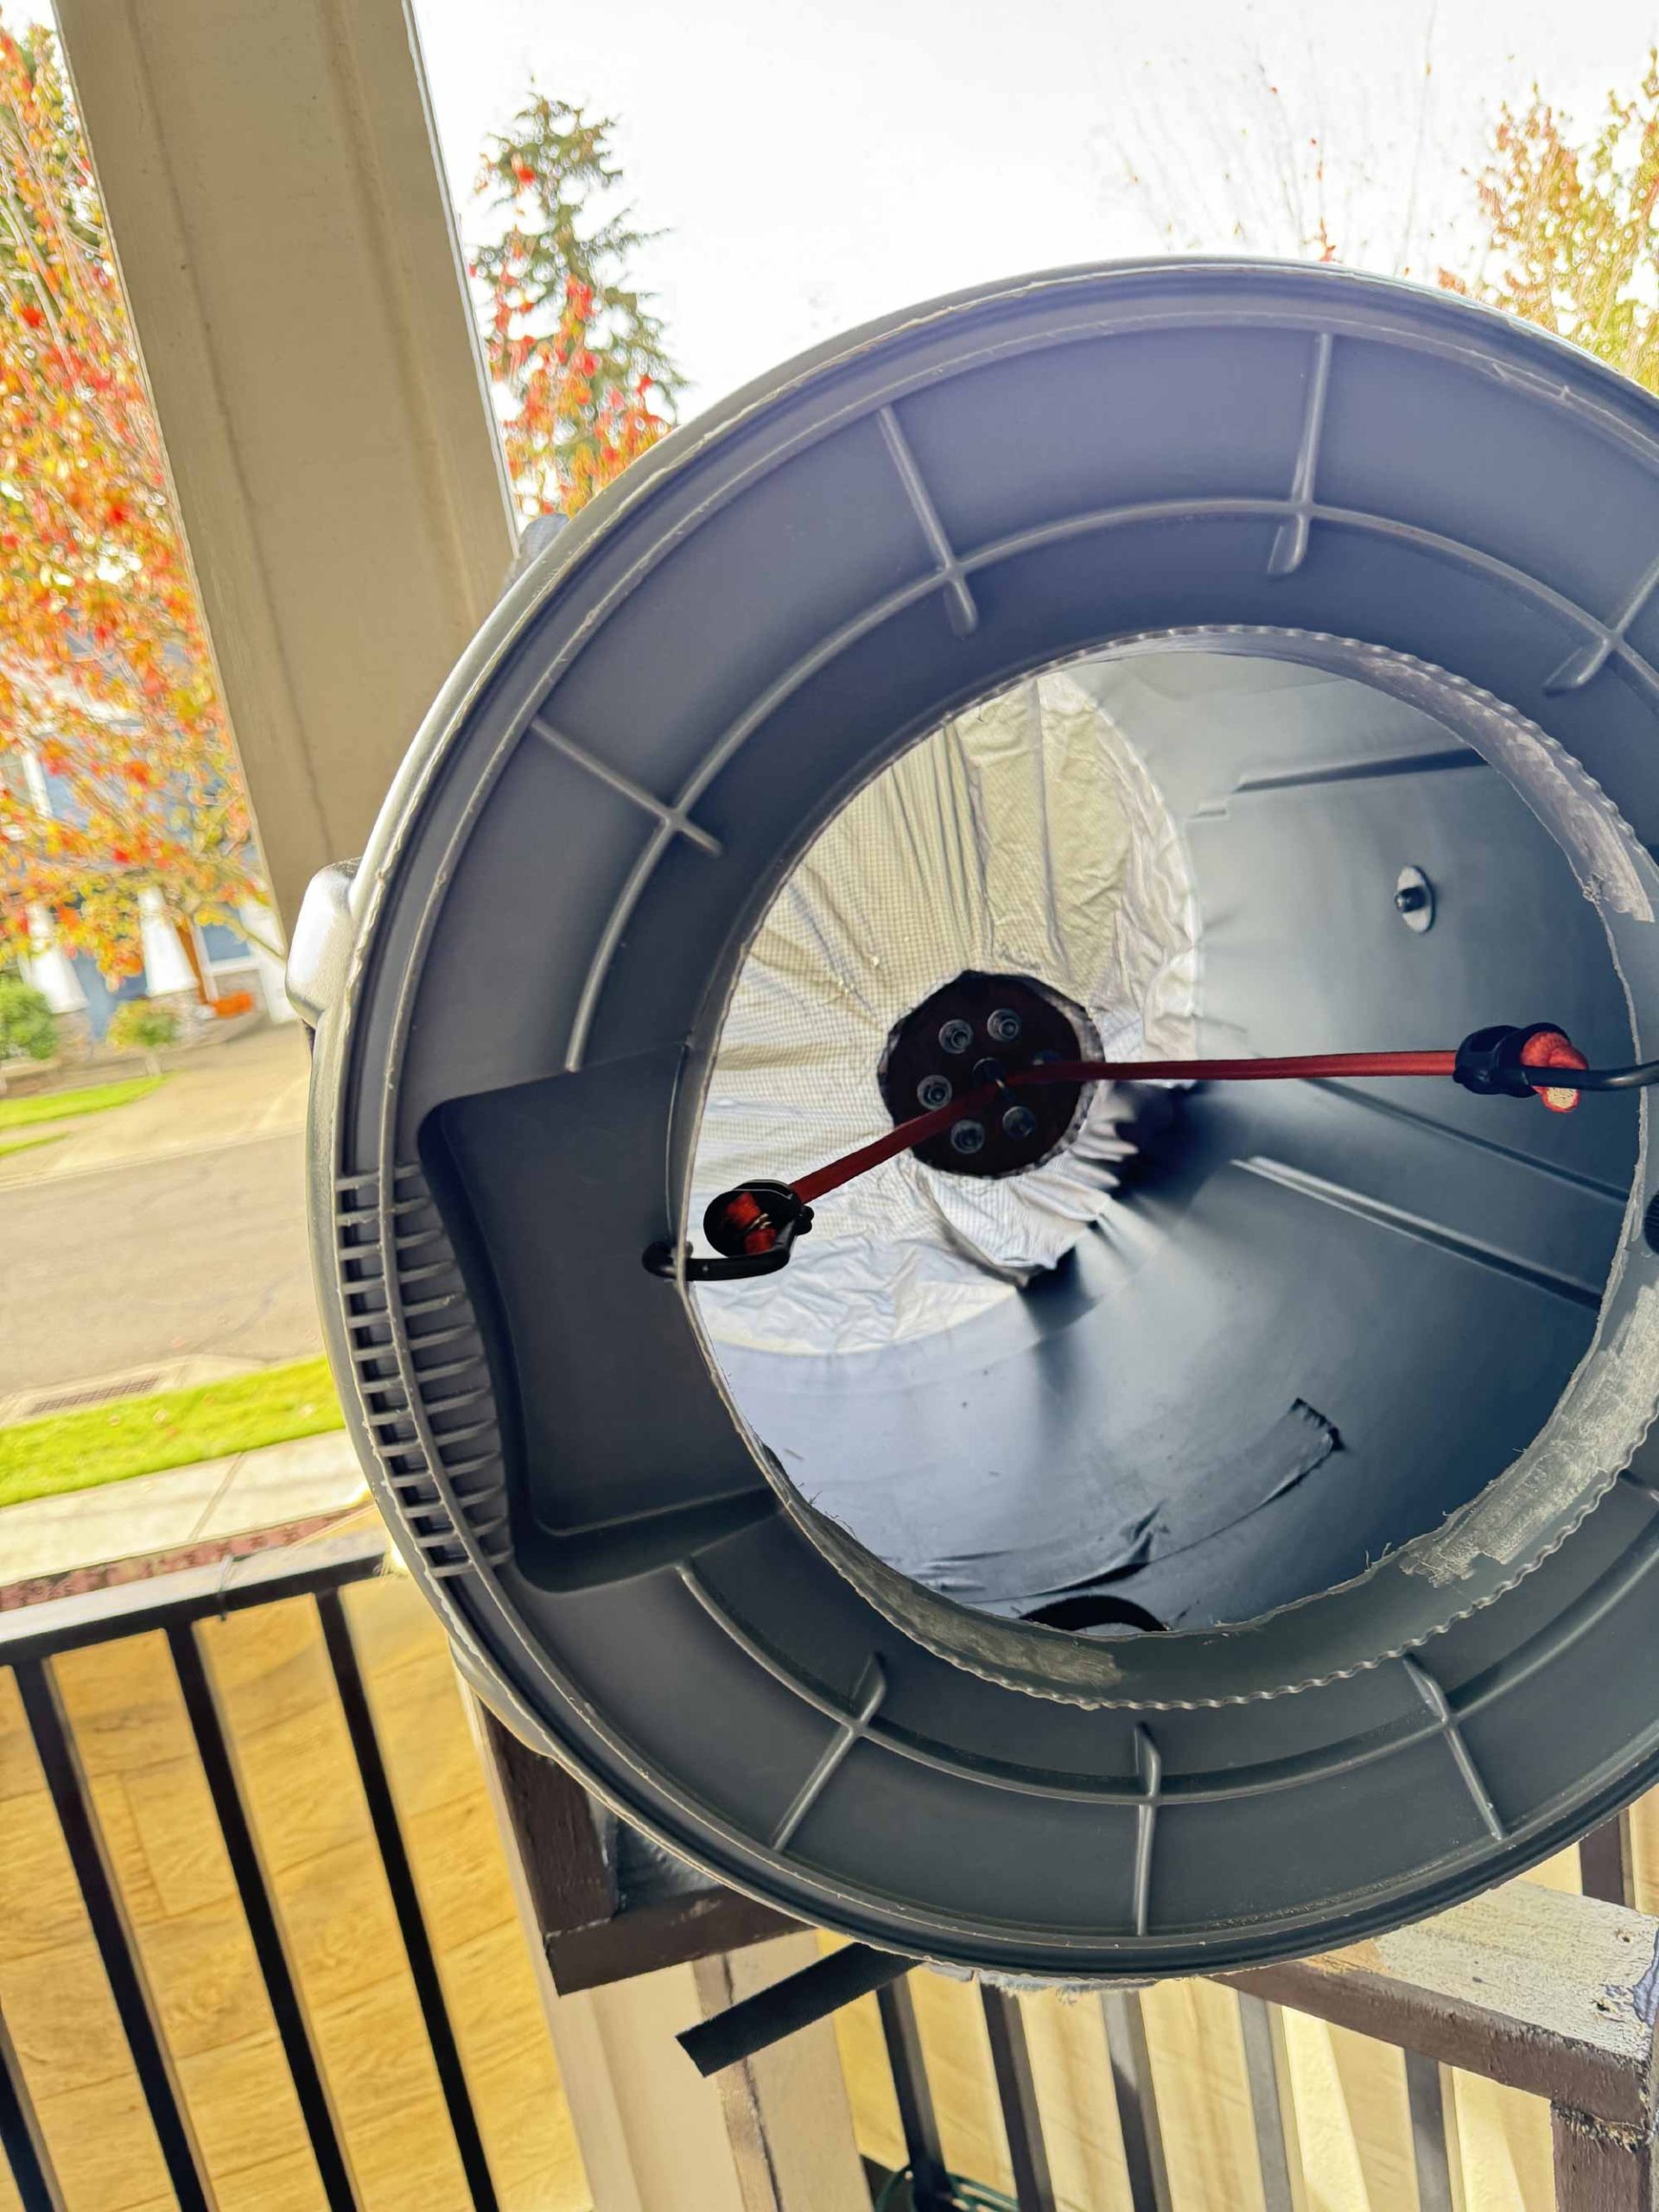
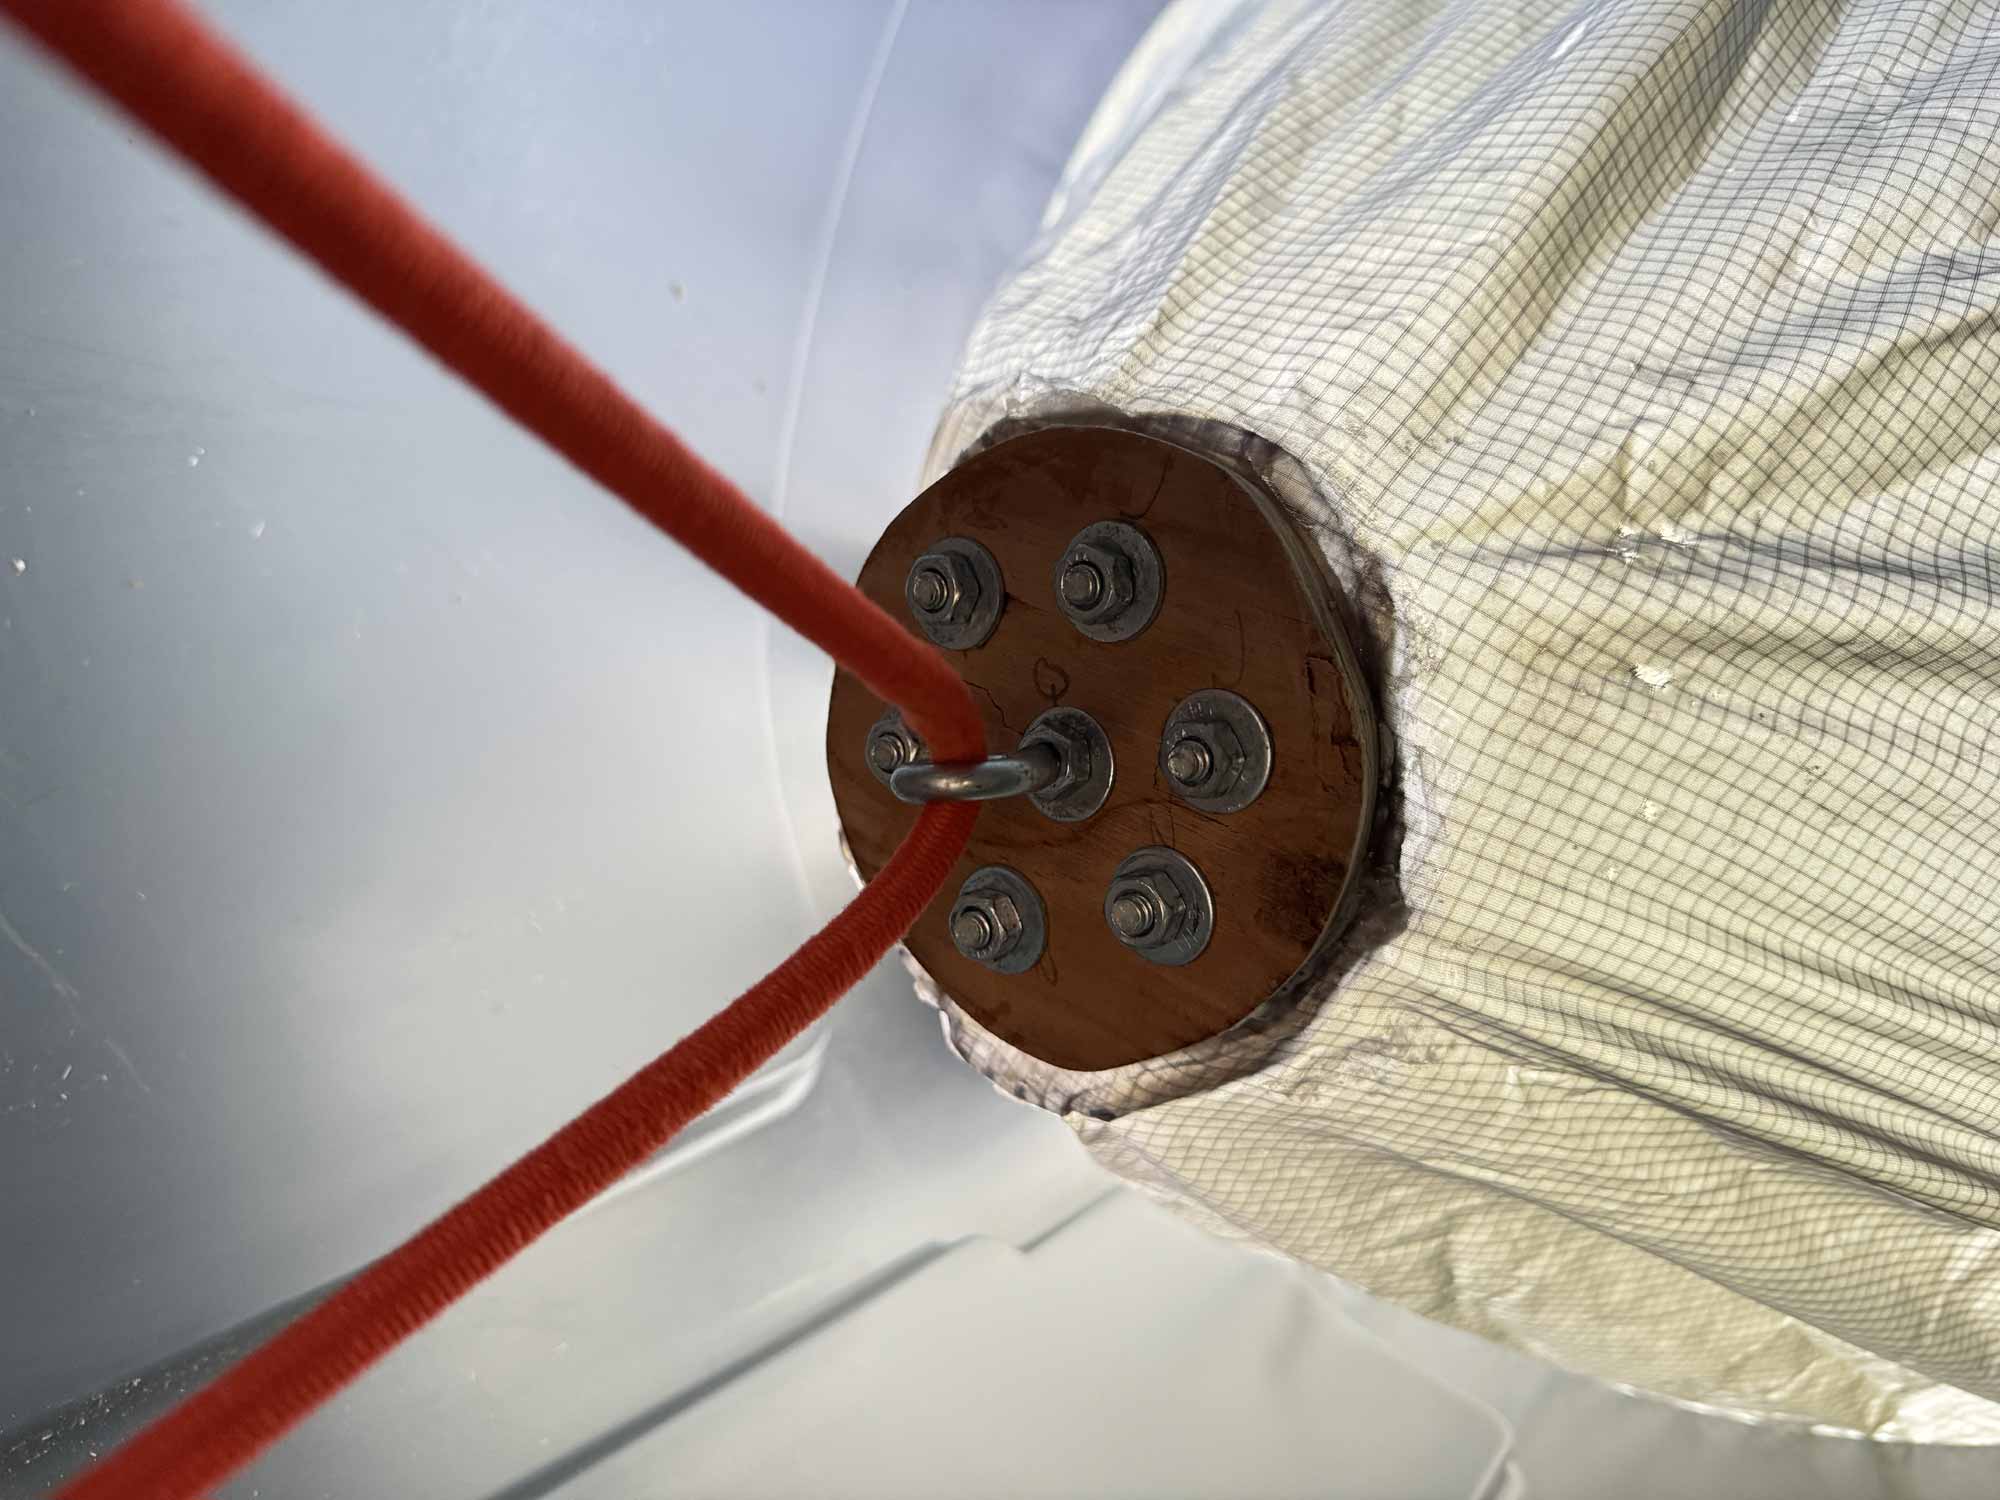
Smoke ring cannons are a simple build anyone can accomplish with a few basic tools, a plastic trashcan and some ripstop kite fabric.  The smoke rings are created by what is known as the vortex effect.  Air within the vortex spins faster than the surrounding air, causing air to curl and creating a smoke ring.  This effect is amplified visually by adding fog from a fog machine.  Kids love catching the ‘rings’ and can feel the short burst of air when they catch the ring.

  1. To begin, create a wooden articulating base.  Start by cutting four 2.5ft lengths.  Lay the lumber on edge and screw together, creating a square. 
  2.  We will now build the lower uprights by using three pieces of lumber to create an upside down ‘U’. Cut two lower uprights that are 3.5 feet long.  Screw these uprights inside of the base, equidistant from both ends.  Cut one more piece of lumber long enough to horizontally connect the ends of these lower uprights horizontally, screw into place.
  3. Begin by cutting out an approximately 12 inch diameter disk, making 12 inch diameter hole in the bottom of the trash can using the rotary tool and multipurpose bit.  There is a support ridge on the bottom of the can, make your cut just inside this piece so the support ridge remains with the can and you are only removing a flat disk of plastic.  Retain this flat plastic disc for use later.
  4. Now place and secure the fog machine with velcro. Place the trash can on its side with both of the handles out to the sides and level with each other.  Place the fog machine inside the trashcan with the nozzle toward the front, approximately four inches from the opening you have cut.  
  5. Using a sharpie, trace the outline of the fog machine onto the trash can.  Remove the fog machine.  Using the hot knife, make four lengthwise holes that are about an inch in from each end and each side.  Run velcro through these holes and around the fog machine.  Secure the fog machine to the can by tightening the velcro.
  6. Now build the upright ‘U’ for the trashcan out of three pieces or wood.  With the handles out to the sides and level, find the center of gravity of the trashcan by placing a piece of 2×4 on the ground lengthwise and setting the can on top of it perpendicularly.  Move the can until both ends of the trashcan balance in the air, mark the center of gravity on the sides of the can.
  7. Using a drill, drill holes into the sides of the can to mount it to the uprights.  Assure the holes are half way up the can on both sides and the handles are level.
  8. Measure the distance between the holes you have drilled from inside the can.  Add 3 inches to this length, then cut a piece of 2×4 to this length.  This piece of wood will be the horizontal piece in the upper ‘U’.
  9. Measure the distance between the holes you have drilled down to the ground.  Double this measurement and then cut (2) 2x4s to this length.  These two pieces serve as the vertical sections of the upper ‘U’.  Screw the horizontal lumber piece into the two vertical pieces.
  10.  Now, connect the lower cannon section to the upper cannon section.  To do this, set the upper section on the lower section and drill a 0.25 inch hole through the center of both pieces.  Also drill a 0.25 inch hole through the center of the plastic disk that was cut out of the trash can and place it between the upper and lower cannon section.  Using a washer at the head of the bolt, connect all three pieces using the 0.25 x 3.5 inch bolt.  Add a washer and two nuts to lock into place. 
  11. Now attach the trashcan to the uprights.  Drill a hole in the center of each upright about 1.5 inches from the end.  Use one washer at the bolt head, two between the wood upright and the trashcan, connect the trashcan to the upright.  Use a double nut to lock into place.  Repeat these steps on the other side.   You should now be able to aim the cannon left and right as well as up and down.
  12. Now cut the appropriate amount of ripstop nylon.  Measure the diameter of the large trashcan opening.  Add 12 inches to that measurement to get the proper nylon diameter.  Using a sharpie, mark the center on the nylon and draw a circle on the nylon.  For later use, mark a 8.5 inch diameter circle around the center point.
  13. Now create two attachment points for the handle of the canon.  Buy two 8 inch rounds of plywood, or use the jig saw to cut any scrap wood into 8 inch rounds.  Sand the edges of both of these rounds so there is nothing sharp to damage the nylon.  On one round, drill (5) 0.25 inch holes around the perimeter and (2) 0.25inch holes that are two inches off of the center mark.  These two will be attachment points for the handles.  
  14. Liberally glue this round to the nylon, assuring the round is within the 8.5 inch circle you marked on the nylon marked in step 12.  Now glue the remaining wood round on the other side of the nylon, effectively sandwiching the nylon between these two wood rounds.  Let dry.  Clamp the wood rounds or use a heavy object such as a book
  15. Using the predrilled round as a guide, drill all five perimeter holes through both rounds and secure with washers and nuts.  Drill the two off center holes and secure with the two eyebolts using washers and nuts on both ends while attaching the kayak handle to the non-eyebolt end.  Thread locker recommended.  Open these two eyebolts with pliers and insert the orange bungee.  Connect the ends of the bungee. 
  16. Secure the nylon to the trashcan loosely using the endless ratchet strap.  Depending on your type of trashcan, it may be necessary to cut or sand parts of the trashcan down using the rotary tool so the nylon and ratchet strap lay flush against the trashcan.  Pull any slack through the strap so there is only 0.25 of an inch of loose nylon and then tighten the strap.
  17. Connect the bungee to the ‘bottom’ rim of the trashcan.  You can now test fire the cannon by pulling back on the kayak handle and releasing.
  18. The fog machine pickup needs to be upgraded.  Cut the fog machine pickup and drill a hole in the cap of a fog juice jug you purchased.  Using the vinyl tubing and barbed line connectors, connect the fog machine to the fog jug on the ground going through the ‘bottom’ of the trashcan.  Power for the fog machine and remote control buttons can be run through the ‘bottom’ of the trashcan.
  19. You are now ready to power on the fog machine, set the LED color to red, and begin test firing the cannon.  Load with two seconds of smoke, pull back on the handle and release!

Continuously Drinking Skeletons

Using one of your dressed and weather skeletons made earlier in these instructions (assure the skeleton has a white shirt with long sleeves), the main items you’ll need is a skeleton, trunk, plastic, zip ties and bottle.   When done you will have a fully drinking skeleton in a treasure chest.  Alternatively, your skeleton does not have to be in a treasure chest, they can be sitting in a barrel, planter, or nearly anything that can be lined with plastic and made waterproof.

  1. Begin by preparing your chest.  Assure the chest is vacuumed, clean and free of all sharp edges that may puncture your plastic liner.
  2. Measure the depth of your chest, the skeleton will be sitting in the center of the chest, only about 8 inches below the lip of the container.  To achieve this, the skeleton will need to sit on something strong.  I cut up foam scraps that were 12in x 12in and glued them into a stack, making a stool for the skeleton to sit on.  You can use just about anything such as home gym foam pads or an Ikea stool will work.  Even an internally reinforced cardboard box will work, however a material that will tolerate moisture without molding or breaking down is ideal as it will last many seasons.
  3. Lay the rolled plastic inside the chest to use as a waterproof liner (although not as durable, cutting up a black contractor trashcan liner will work too), covering the sides, bottom of the chest, and the stool for the skeleton you have created.  Assure to leave plenty of slack.  Fill the trunk with about 1 inch of water allowing the plastic to take on the shape of your trunk and stool.  Using your fingers, gently push the plastic liner into all the edges to assure there is as little stress as possible on the plastic.  Clamps can be used in this step if available. Using the staple gun, use one staple on each side, near the lip of the container to tack the plastic in place, we are only tacking in place as it may be necessary to lengthen and make adjustments later.
  4. Empty the Perrier bottle of sparkling water.  Using a utility knife cut the bottle just below the neck flange so you remove the threaded section and the flange. Drill a hole about an inch from the bottom large enough to insert the vinyl tubing.  Note that the bottle has a double liner that is not easily drilled through – this is okay and you do not need to drill through the second liner.  Using the needle nose pliers, do your best to slightly separate the second liner from the bottle at the spout.  To achieve slight separation also try using the drill bit and hole you made by slowly switching between a forward and backward direction to push and pull the second liner enough to allow a path for the water to make it out the spout of the bottle.   Insert the vinyl tubing into the bottle about two inches.
  5. Now lets work on the skeleton using the picture on the left as an example.  Roll up the left sleeve of the skeleton.  The bones in the fingers need to be shaped.  The goal is to shape the fingers so they are slightly smaller than the bottle so the fingers firmly grip the bottle by coming over the top.  All five fingers including the thumb will curl up and over the top of the bottle as the thumb is not flexible enough to grip the bottle as you would with your own hand.   When shaping fingers I recommend an oven glove, heat gun and patience in this process.  To shape the fingers, place your hand and fingers behind the skeleton hand and fingers, palms up.  Slowly use the heat gun to heat each finger, focusing on the finger joints, until you can feel the fingers are now slightly bendable.  Slowly bend the fingers about an inch and let cool for 20 seconds before repeating.  Go slowly in small increments to avoid breaking fingers.  Once grip is appropriately closed, test fit the bottle so there is little room between the bottle and fingers from palm to fingertip.
  6. Lets work on the skeleton.  On a worksurface, pose the skeleton in the sitting position with the left hand outstretched toward the left knee.  It is helpful to clamp or place something heavy on the left hand to keep the skeleton in place. Open the skeleton’s mouth as much as possible and use hot glue on the jaw to hold in place.  Next its key your skeleton’s pelvis remains in a seated position with the spine vertical, but then to manipulate the upper spine to have the skeleton leaning back ever so slightly from the mid back up.  Using the heat gun on the upper spine (starting at the bottom of the rib cage), neck and head, mold the skeleton so while in a seated position, the lower jaw is nearly horizontal (See photo on the left).  This gives them a slight lean backward.
  7. With the skeleton sitting, lets position the left hand and bottle.  The tubing coming out of the bottle should be pointed slightly upward of horizontal, and run backward toward the fingers and palm of the hand then down the arm and then inside the rib cage.  The goal here is to hide the tubing visually from the front of the prop.  Using white zip ties, secure the tubing to the arm bones.  This will later be fully hidden with clothing.  Bottle and jaw positioning is key.  Attempt to get the bottle about 1 inch away from the jaw and about 6 inches above.  It may be necessary to use the heat gun on arms and shoulders and wrist to get the positioning correct.  Again, patience is key in this process.  When you have positioning correct, use a dab of hot glue on the joints to hold them in place temporarily.
  8. Move the skeleton to the trunk for final positioning.  Sit the skeleton down and start with using the left hand and arm to keep the skeleton from leaning back too far.  Drill a hole near the lip of the trunk and use a zip tie to secure down the left hand.  This will keep the skeleton in place.  Bend the right knee and position the right boot so the heel of the boot is inside the trunk and the toe is out of the trunk.  Drill two holes in the sole of the boot, drill one hole in the side of the trunk near the lip and run a zip tie through it to secure the boot to the trunk.  Now outstretch the left leg and secure to the trunk.  Use this opportunity to try different leg positions to achieve proper upright skeleton positioning.  Drill a hole near the lip of the trunk and zip tie the boot or leg bone to the trunk.
  9. There will be significant weight when the tubing and bottle are loaded with water, so lets reinforce the right arm from the spine to hand to carry the weight and prevent too much sagging.  Using the roll wire, feed the wire through the shirt and right shoulder through the rib cage and then make a 90 degree bend down the spine.  Use 8in white zip ties to tightly secure the wire to the spine every 4 inches or so, continue across the shoulder, upper arm, lower arm, and to the wrist and hand.  Later you’ll want to glue this wire between the hand and bottle, so shape the wire to contour the bottle if necessary and use another temporary zip tie to secure the wire between the hand and bottle. In this next step a partner is recommended as we will fine tune arm position.  Connect the pump to the tubing and note there is flow control on the pump.  Turn the flow control down to about 25% noting that 100% flow is when the flow control tab is parallel to the pipe.  0% is when the flow control tab is perpendicular to the pipe.  Plug in an extension cord and bring it near the trunk.
  10. Fill the trunk with water so the pump intake is fully covered.  While supporting the elbow, plug in pump and be ready to disconnect the pump if necessary.  The goal is for the water to exit the bottle and pour into the lower jaw, so it goes through and into the rib cage draining back into the trunk.  This will take a few attempts to get right.  When you feel you are close, glue the right fingers and hand.  Cut existing zip ties and loosely zip tie the bottle to the hand allowing enough room for glue.  Add Gorilla Glue and spray with water.  Tighten the zip ties and let dry.  Once dry cut off the zip ties.
  11. Use hot glue to seal any water leaks between the tubing and bottle.  Let dry and re-test with water.  You may need to adjust the arm, hand, and skeleton positioning to get water to pour through the lower jaw.  When you feel you are close, use the Gorilla Glue to lock some joints into place, and for best adhesion spray the Gorilla Glue with water after application and let dry.  I suggest gluing joints into place in this order and re-testing to assure the water is going where you want.
    1. Left ankle, knee, hip, shoulder, elbow, and wrist. 
    2. Right elbow, and wrist.
    3. Right Shoulder.
    4. Right knee and hip (if necessary, else these joints can remain free for fine tuning each season).
  12. Trim all zip ties and unroll the right arm sleeve.  Use hot glue to tack the end of the right sleeve into place to hide any tubing.  Then continue to use hot glue to tack the clothing around the arm, bones and shoulder to hide the tubing and wire.
  13. You now have a continuously drinking skeleton, congratulations!


BEHIND THE SCENES

Masters of their Craft

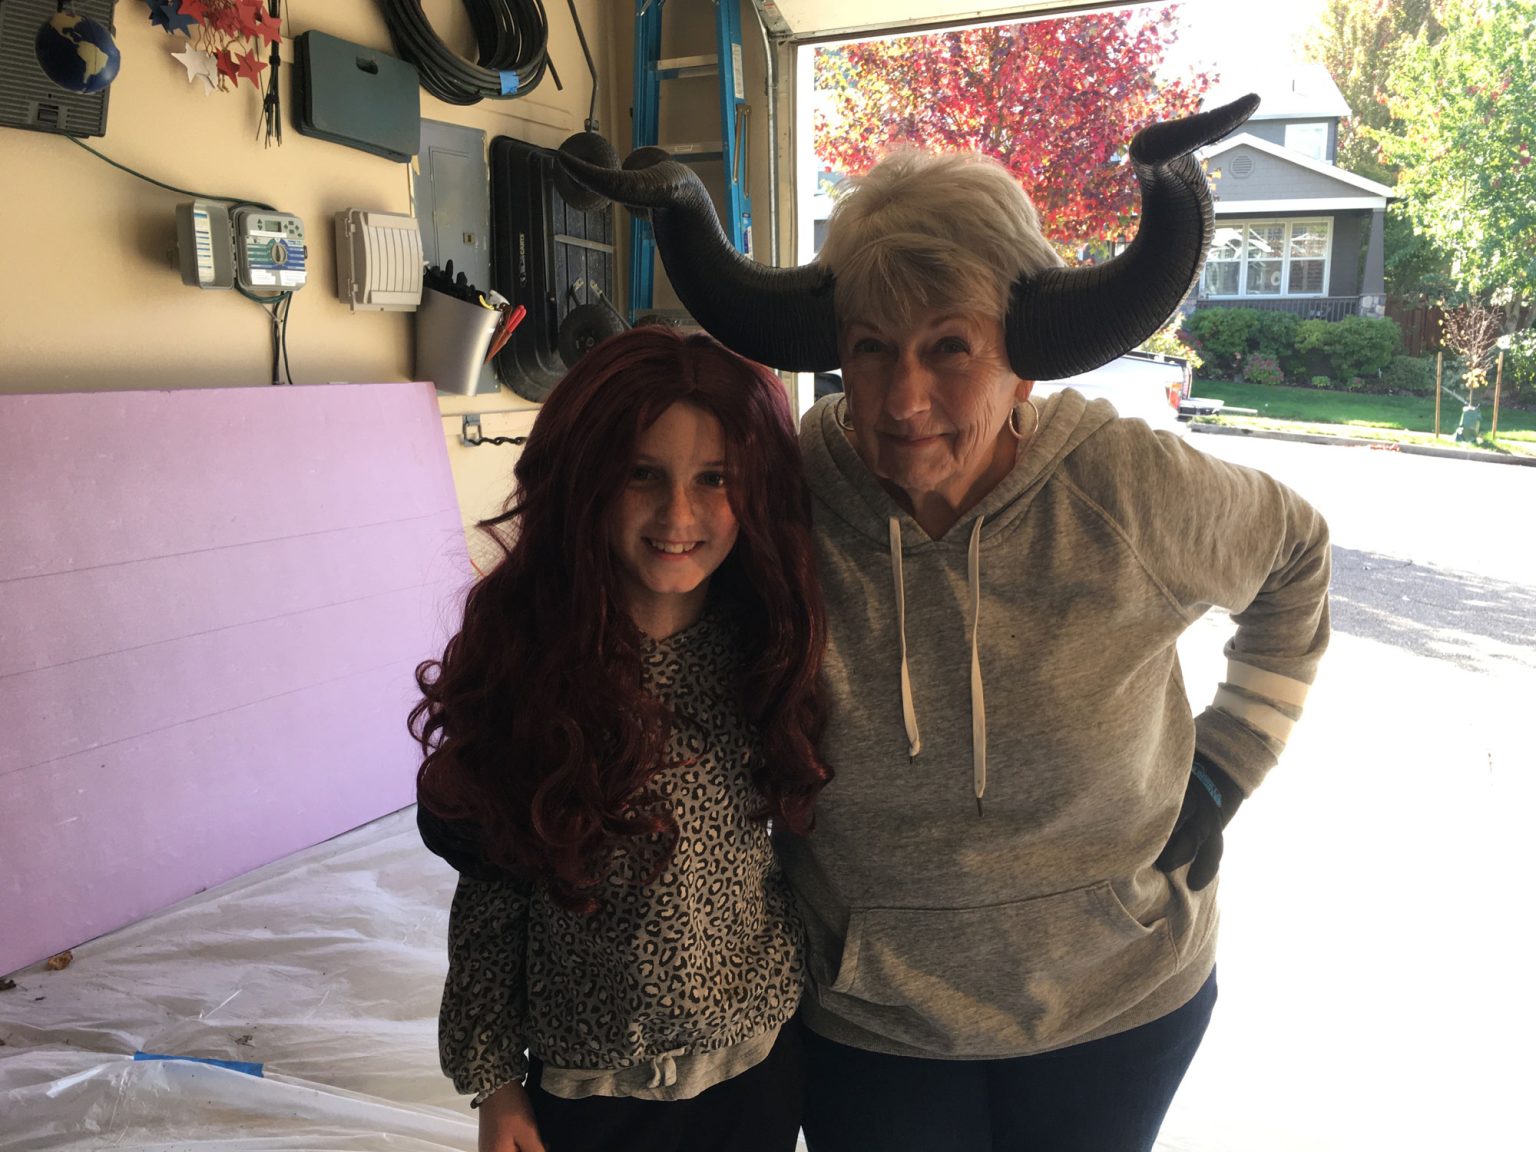
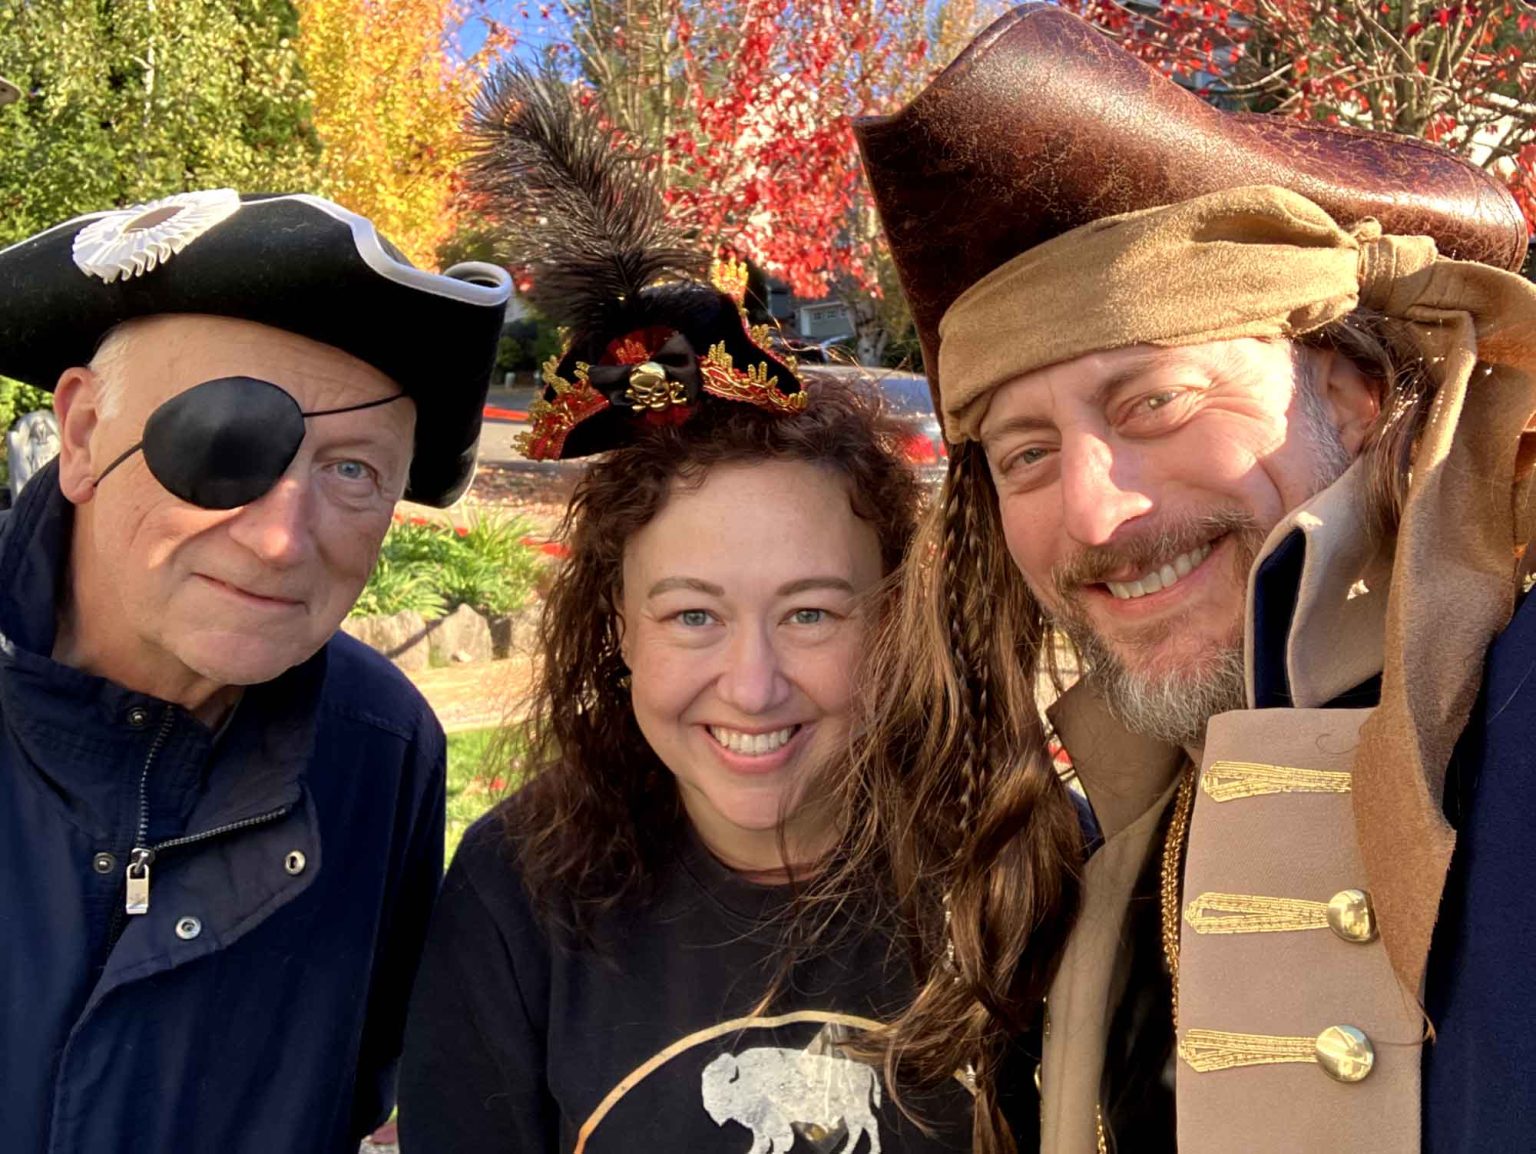
Denny, Molly, Curtis, and Erin lovingly and painstakingly create all of the props and elements used in the display. From staining purchased skeletons to “age” them, to creating life-sized gravestones and real drinking skeleton pirates, nothing is too difficult for the build team. Here’s a behind the scenes look at some of the props and elements we create.  

Creating Realistic Weathered Skeltons Dressed for Success

BUILDS

How To

This treasure trove of detailed instructions will help you create your very own displays! Over the years, Denny, Molly, Curtis, and Erin have lovingly and painstakingly created all of the props and elements used in the display from scratch.  We’ve also learned a boat load about making and building along the way.  Here we provide all of the tips and tricks for you with goal of making your own display the best on the high seas!  We hope to make the Pirates of Spanish Bay a neighborhood event.  From staining and dressing purchased skeletons to “age” them, to creating life-sized gravestones and real drinking skeletons, these instructions should be a big help to anyone looking to create their own display and become one of the Pirates of Spanish Bay!